|
» |
|
|
|
This section addresses the following topics: You might need to do the following tasks: Move the disks in a volume
group to different hardware locations on a system. Move entire volume groups
of disks from one system to another.
| | | |  | CAUTION: Moving a disk that is part of your root volume
group is not recommended. For more information, see Configuring
HP-UX for Peripherals. | | | | |
The /etc/lvmtab and /etc/lvmtab_p files contain information about the mapping
of LVM disks on a system to volume groups; that is, volume group names
and lists of the physical volumes included in volume groups. When
you do either of the previous tasks, these configuration files must
be changed to reflect the new hardware locations and device files
for the disks. However, you cannot edit these files directly because
they are not text files. Instead, you must use vgexport and vgimport to reconfigure the volume groups,
which records configuration changes in the LVM configuration files. Moving Disks Within a System | |
There a two procedures for moving the disks in
a volume group to different hardware locations on a system. Choose
a procedure depending on whether you use persistent or legacy device
files for your physical volumes; the types of device files are described
in “Legacy Device Files versus Persistent Device Files”. LVM Configuration with Persistent Device
FilesIf your LVM configuration uses persistent device
files, follow these steps: Be
sure that you have an up-to-date backup for both the data within the
volume group and the volume group configuration. Deactivate
the volume group by entering the following command: # vgchange -a n /dev/vgnn |
Physically
move your disks to their desired new locations. Activate
the volume group as follows: # vgchange -a y /dev/vgnn |
LVM Configuration with Legacy Device FilesThe names of legacy device files change when the
hardware paths to their physical devices change. Therefore, you must
update the LVM configuration by exporting and importing the volume
group to use the new legacy device files. Follow these steps: Be sure
that you have an up-to-date backup for both the data within the volume
group and the volume group configuration. Deactivate
the volume group as follows: # vgchange -a n /dev/vgnn |
If you want to retain the
same minor number for the volume group, examine the volume group's group file as follows: # ls -l /dev/vgnn/group
crw-r--r-- 1 root sys 64 0x010000 Mar 28 2004 /dev/vgnn/group |
For this example,
the volume group major number is 64, and the minor number is 0x010000. Remove
the volume group device files and its entry from the LVM configuration
files by entering the following command: # vgexport -v -s -m /tmp/vgnn.map /dev/vgnn |
Physically
move your disks to their desired new locations. To view
the new locations, enter the following command: If you are using an HP-UX
release before March 2008, or if you want to retain the minor number
of the volume group device file, create it using the procedure in “Creating the Volume Group Device File”. Since the group file in this example
has a major number of 64 and a minor number of 0x01000000, enter the
following commands: # mkdir /dev/vgnn
# mknod /dev/vgnn/group c 64 0x010000 |
Add the
volume group entry back to the LVM configuration files using the vgimport command as follows: # vgimport -v -s -m /tmp/vgnn.map /dev/vgnn |
Activate
the newly imported volume group as follows: # vgchange -a y /dev/vgnn |
Back
up the volume group configuration as follows:
Moving Disks Between Systems | |
To move the disks in a volume group to different
hardware locations on a different system, export the volume group
from one system, physically move the disks to the other system, and
import the volume group there. The procedures for exporting and importing
a volume are described in “Exporting a Volume Group” and “Importing a Volume Group”. They are illustrated in the following
example. To move the three disks in the volume group /dev/vg_planning to another system, follow these steps: If any
of the logical volumes contain a file system, unmount the file system.
If any of the logical volumes are used as secondary swap, disable
swap and reboot the system; for information on secondary swap, see HP-UX System Administrator's Guide: Configuration Management. Make the volume group and
its associated logical volumes unavailable to users as follows: # vgchange -a n /dev/vg_planning |
Preview
the removal of the volume group information from the LVM configuration
files using the following command: # vgexport -p -v -s -m /tmp/vg_planning.map /dev/vg_planning |
With the -m option,
you can specify the name of a map file that will hold the information
that is removed from the LVM configuration files. The map file contains
the names of all logical volumes in the volume group. You use this
map file when you set up the volume group on the new system. If the preview is satisfactory,
remove the volume group information as follows: # vgexport -v -s -m /tmp/vg_planning.map /dev/vg_planning |
The vgexport command removes
the volume group from the system and creates the /tmp/vg_planning.map file. Connect the disks to the new
system and copy the /tmp/vg_planning.map file
to the new system. If
you are using an HP-UX release before March 2008, create the volume
group device file using the procedure in “Creating the Volume Group Device File”. To get
device file information about the disks, run the ioscan command: To preview
the import operation, run the vgimport command
with the -p option: # vgimport -p -N -v -s -m /tmp/vg_planning.map /dev/vg_planning |
To import the volume group,
run vgimport without the -p option
as follows: # vgimport -N -v -s -m /tmp/vg_planning.map /dev/vg_planning |
Activate
the newly imported volume group as follows: # vgchange -a y /dev/vg_planning |
Moving Data to a Different Physical Volume | |
You can use the pvmove command
to move data contained in logical volumes from one disk to another
disk or to move data between disks within a volume group. For example, you can move the data from a specific
logical volume from one disk to another, to use the vacated space
on the first disk for another purpose. To move the data in logical
volume /dev/vg01/markets from the disk /dev/disk/disk4 to the disk /dev/disk/disk7, enter the following: # pvmove -n /dev/vg01/markets /dev/disk/disk4 /dev/disk/disk7 |
On the other hand, you can move all the data contained
on one disk, regardless of which logical volume it is associated with,
to another disk within the same volume group. For example, do this
to remove a disk from a volume group. You can use pvmove to move the data to other specified disks or let LVM move the data
to appropriate available space within the volume group, subject to
any mirroring allocation policies. To move all data off disk /dev/dsk/disk3 and relocate it at the destination disk /dev/disk/disk5, enter the following command: # pvmove /dev/disk/disk3 /dev/disk/disk5 |
To move all data off disk /dev/disk/disk3 and let LVM transfer the data to available space within the volume
group, enter the following command: In each of the previous instances, if space does
not exist on the destination disk, the pvmove command
fails. | | | |  | NOTE: The pvmove command is not an
atomic operation; it moves data extent by extent. If pvmove is abnormally terminated by a system crash or kill -9, the volume group can be left in an inconsistent configuration showing
an additional pseudomirror copy for the extents being moved. You can
remove the extra mirror copy using the lvreduce command with the –m option on each of the
affected logical volumes; there is no need to specify a disk. | | | | |
Creating a Spare Disk | |
To configure a spare physical volume into a volume
group for which you want protection against disk failure, follow these
steps before a disk failure actually occurs: For more information on disk sparing, see “Increasing Disk Redundancy Through Disk Sparing”. Reinstating a Spare Disk | |
After a failed disk has been repaired or a decision
has been made to replace it, follow these steps to reinstate it and
return the spare disk to its former standby status: Physically
connect the new or repaired disk. Restore
the LVM configuration to the reconnected disk using vgcfgrestore as follows: # vgcfgrestore -n /dev/vg01 /dev/rdisk/disk1 |
Ensure
the volume group has been activated as follows: # vgchange -a y /dev/vg01 |
Be sure that allocation of extents is now allowed on
the replaced disk as follows: # pvchange -x y /dev/disk/disk1 |
Use the pvmove command to move the data from the spare to the replaced
physical volume. For example: # pvmove /dev/disk/disk3 /dev/disk/disk1 |
The data from the spare disk is now back on the
original disk or its replacement, and the spare disk is returned to
its role as a standby empty disk.
For more information on disk sparing, see “Increasing Disk Redundancy Through Disk Sparing”. Modifying Physical Volume Characteristics | |
| | | | | NOTE: Version 2.x volume groups do not support bootable
physical volumes. | | | | |
The vgmodify command enables
you to modify a volume group to adapt to changes in physical volumes.
In particular, you can adjust the volume group to recognize size changes
in physical volumes, and you can change a physical volume type between
bootable and nonbootable. Disk arrays typically allow a LUN to be resized.
If you increase the size of a LUN, follow these steps to incorporate
the additional space into the volume group: Increase the LUN size using
the instructions for the array. Run vgmodify to detect any physical volume size changes. It also reports whether
all of the space can be made available to the volume group. If vgmodify reports that the maximum number of physical extents per physical
volume (max_pe) is too small to accommodate the
new size, use vgmodify with the -t and -n options to determine a new value for max_pe, as described in “Modifying Volume Group Parameters”. Review the values by running vgmodify with the new settings and the -r option. Deactivate the volume group. Commit any new value of max_pe and update the physical volume information by running vgmodify without the -r option. Activate the volume group.
To verify that the increased space is available, run the vgdisplay and pvdisplay commands.
| | | |  | TIP: Starting with the September 2008 release of HP-UX
11i Version 3, you can use the –E and –a options to vgmodify to recognize
and accommodate size changes without deactivating
the volume group. For more information, see vgmodify(1M). | | | | |
For example, to increase the size of the physical
volume /dev/rdisk/disk6 from 4 GB to 100000000
KB, follow these steps: Increase the LUN size using
the instructions for the disk array. Run vgmodify with the -v and -r options to
check whether any disks have changed in size and whether all of the
space on the physical volumes can be used. # vgmodify -v -r vg32
Current Volume Group settings:
Max LV 255
Max PV 16
Max PE per PV 1016
PE Size (Mbytes) 32
VGRA Size (Kbytes) 176
/dev/rdisk/disk6 Warning: Max_PE_per_PV for the volume group
(1016) too small for this PV (3051).
Using only 1016 PEs from this physical volume.
"/dev/rdisk/disk6" size changed from 4194304 to 100000000kb
An update to the Volume Group IS required
New Volume Group settings:
Max LV 255
Max PV 16
Max PE per PV 1016
PE Size (Mbytes) 32
VGRA Size (Kbytes) 176
Review complete. Volume group not modified |
The expanded physical volume requires 3051 physical
extents to use all its space, but the current max_pe value limits this to 1016. To determine the optimal values
for max_pv and max_pe, run vgmodify -t, with and without the -n as
follows: # vgmodify -t vg32
Current Volume Group settings:
Max LV 255
Max PV 16
Max PE per PV 1016
PE Size (Mbytes) 32
VGRA Size (Kbytes) 176
VGRA space (Kbytes) without PE renumbering 896
VGRA space (Kbytes) PE renumbering lower 32768
Volume Group optimized settings (no PEs renumbered):
max_pv(-p) max_pe(-e) Disk size (Mb)
2 53756 1720193
3 35836 1146753
4 26876 860033
...
28 3836 122753
30 3580 114561
32 3324 106369
35 3068 98177
38 2812 89985
...
255 252 8065 |
The table shows that without renumbering physical
extents, a max_pv of 35 or lower permits a max_pe sufficient to accommodate the increased physical
volume size. # vgmodify -v -t -n vg32
Volume Group configuration for /dev/vg32 has been saved in
/etc/lvmconf/vg32.conf
Current Volume Group settings:
Max LV 255
Max PV 16
Max PE per PV 1016
PE Size (Mbytes) 32
VGRA Size (Kbytes) 176
VGRA space (Kbytes) on all Physical Volumes:
PV current -n
/dev/rdisk/disk6 896 32768
/dev/rdisk/disk5 896 32768
Summary 896 32768
Volume Group optimized settings (PEs renumbered lower):
max_pv(-p) max_pe(-e) Disk size (Mb)
61 65535 2097152
62 65532 2097056
63 64252 2056096
...
251 16124 516000
252 16048 513568
255 15868 507808 |
The table shows that if physical extents are renumbered,
all values of max_pv permit a max_pe large enough to accommodate the increased physical volume size. For this example, select a max_pv of 10, which permits a max_pe value of 10748. Preview the changes by using
the -r option to vgmodify as follows: # vgmodify -p 10 -e 10748 -r vg32
Current Volume Group settings:
Max LV 255
Max PV 16
Max PE per PV 1016
PE Size (Mbytes) 32
VGRA Size (Kbytes) 176
The current and new Volume Group parameters differ.
"/dev/rdisk/disk6" size changed from 4194304 to 100000000kb
An update to the Volume Group IS required
New Volume Group settings:
Max LV 255
Max PV 10
Max PE per PV 10748
PE Size (Mbytes) 32
VGRA Size (Kbytes) 896
Review complete. Volume group not modified |
Deactivate the volume group
as follows: # vgchange -a n vg32
Volume group "vg32" has been successfully changed. |
Commit the new values as follows: # vgmodify -p 10 -e 10748 vg32
Current Volume Group settings:
Max LV 255
Max PV 16
Max PE per PV 1016
PE Size (Mbytes) 32
VGRA Size (Kbytes) 176
The current and new Volume Group parameters differ.
"/dev/rdisk/disk6" size changed from 4194304 to 100000000kb
An update to the Volume Group IS required
New Volume Group settings:
Max LV 255
Max PV 10
Max PE per PV 10748
PE Size (Mbytes) 32
VGRA Size (Kbytes) 896
New Volume Group configuration for "vg32" has been saved in
"/etc/lvmconf/vg32.conf"
Old Volume Group configuration for "vg32" has been saved in
"/etc/lvmconf/vg32.conf.old"
Starting the modification by writing to all Physical Volumes
Applying the configuration to all Physical Volumes from
"/etc/lvmconf/vg32.conf"
Completed the modification process.
New Volume Group configuration for "vg32" has been saved in
"/etc/lvmconf/vg32.conf.old"
Volume group "vg32" has been successfully changed. |
Activate the volume group
and verify the changes by entering the following commands: # vgchange -a y vg32
Activated volume group
Volume group "vg32" has been successfully changed.
# vgdisplay vg32
--- Volume groups ---
VG Name /dev/vg32
VG Write Access read/write
VG Status available
Max LV 255
Cur LV 0
Open LV 0
Max PV 10
Cur PV 2
Act PV 2
Max PE per PV 10748
VGDA 4
PE Size (Mbytes) 32
Total PE 3119
Alloc PE 0
Free PE 3119
Total PVG 0
Total Spare PVs 0
Total Spare PVs in use 0
VG Version 1.0 |
Changing Physical Volume Boot Types | | | | | NOTE: The vgmodify command does not
support Version 2.x volume groups. | | | | |
When a physical volume is initialized for LVM
use, it can be made bootable or nonbootable. Bootable physical volumes
require additional space in their LVM metadata for boot utilities
and information. If a physical volume was accidentally initialized
as bootable, you can convert the disk to a nonbootable disk and reclaim
LVM metadata space. | | | | | CAUTION: The boot volume group requires at least one bootable
physical volume. Do not convert all of the physical volumes in the
boot volume group to nonbootable, or your system will not boot. | | | | |
To change a disk type from bootable to nonbootable,
follow these steps: Use vgcfgrestore to determine if the volume group contains any bootable disks. Run vgmodify twice, once with the -B n and once without it.
Compare the available values for max_pe and max_pv. Choose new values for max_pe and max_pv. Review the values
by running vgmodify with the new settings and the -r option. Deactivate the volume group. Commit the changes by running vgmodify without the -r option. Activate the volume group.
Run the vgcfgrestore or pvdisplay commands to verify that the disk type has changed.
For example, to convert any bootable disks in
volume group vg, follow these steps: Check if any physical volumes
in vg01 are bootable as follows: # vgcfgrestore -l -v -n vg01
Volume Group Configuration information in "/etc/lvmconf/vg01.conf"
VG Name /dev/vg01
---- Physical volumes : 1 ----
PV Type Size (kb) Start (kb) PVkey
c2t1d0 Bootable 35566480 2912 0
max_pv 16 max_pe 1085 max_lv 255 |
To determine which values
of max_pe and max_pv are
available, run the following command: # vgmodify -t -B n vg01 /dev/rdsk/c2t1d0
Current Volume Group settings:
Max LV 255
Max PV 16
Max PE per PV 1085
PE Size (Mbytes) 32
VGRA Size (Kbytes) 208
VGRA space (Kbytes) without PE renumbering 2784
VGRA space (Kbytes) PE renumbering lower 32768
Volume Group optimized settings (no PEs renumbered):
max_pv(-p) max_pe(-e) Disk size (Mb)
5 65535 2097122
6 56828 1818498
...
255 1276 40834 |
Compare the values if the disk is made non-bootable,
and if it is not. Enter the following command: # vgmodify -t vg01
Current Volume Group settings:
Max LV 255
Max PV 16
Max PE per PV 1085
PE Size (Mbytes) 32
VGRA Size (Kbytes) 208
VGRA space (Kbytes) without PE renumbering 768
VGRA space (Kbytes) PE renumbering lower 768
Volume Group optimized settings (no PEs renumbered):
max_pv(-p) max_pe(-e) Disk size (Mb)
1 65535 2097120
2 45820 1466240
...
255 252 8064 |
If you change the disk type, the VGRA space available
increases from 768 KB to 2784KB (if physical extents are not renumbered)
or 32768 KB (if physical extents are renumbered). Changing the disk
type also permits a larger range of max_pv and max_pe. For example, if max_pv is
255, the bootable disk can only accommodate a disk size of 8064 MB,
but after conversion to nonbootable, it can accommodate a disk size
of 40834 MB. For this example, select a max_pv value of 6, which permits a max_pe value of 56828. Preview the changes by entering the following command: # vgmodify -r -p 6 -e 56828 -B n vg01 /dev/rdsk/c2t1d0
Current Volume Group settings:
Max LV 255
Max PV 16
Max PE per PV 1085
PE Size (Mbytes) 32
VGRA Size (Kbytes) 208
The current and new Volume Group parameters differ.
An update to the Volume Group IS required
New Volume Group settings:
Current Volume Group settings:
Max LV 255
Max PV 6
Max PE per PV 56828
PE Size (Mbytes) 32
VGRA Size (Kbytes) 2784
Review complete. Volume group not modified |
Deactivate the volume group
as follows: # vgchange -a n vg01
Volume group "vg01" has been successfully changed. |
Commit the new values as follows: # vgmodify -p 6 -e 56828 -B n vg01 /dev/rdsk/c2t1d0
Current Volume Group settings:
Max LV 255
Max PV 16
Max PE per PV 1085
PE Size (Mbytes) 32
VGRA Size (Kbytes) 208
The current and new Volume Group parameters differ.
An update to the Volume Group IS required
New Volume Group settings:
Current Volume Group settings:
Max LV 255
Max PV 6
Max PE per PV 56828
PE Size (Mbytes) 32
VGRA Size (Kbytes) 2784
New Volume Group configuration for "vg01" has been saved in
"/etc/lvmconf/vg01.conf"
Old Volume Group configuration for "vg01" has been saved in
"/etc/lvmconf/vg01.conf.old"
Starting the modification by writing to all Physical Volumes
Applying the configuration to all Physical Volumes from
"/etc/lvmconf/vg01.conf"
Completed the modification process.
New Volume Group configuration for "vg01" has been saved in
"/etc/lvmconf/vg01.conf.old"
Volume group "vg01" has been successfully changed. |
Activate the volume group
and verify the changes as follows: # vgchange -a y vg01
Activated volume group
Volume group "vg01" has been successfully changed.
# vgcfgbackup vg01
Volume Group configuration for /dev/vg01 has been saved in
/etc/lvmconf/vg01.conf
# vgcfgrestore -l -v -n vg01
Volume Group Configuration information in "/etc/lvmconf/vg01.conf"
VG Name /dev/vg01
---- Physical volumes : 1 ----
PV Type Size (kb) Start (kb) PVkey
c2t1d0 Non-Boot 35566480 2912 0
max_pv 6 max_pe 56828 max_lv 255 |
Disabling a Path to a Physical Volume | |
You can temporarily disable LVM's use of
one or all of the physical paths to a physical volume using the pvchange command. Disabling a path, also known as detaching the link, causes LVM to close that
path to the device and stop using it. This can be useful if you want
to guarantee that a link is idle, such as when you are running diagnostics
on an I/O card, replacing an I/O card, or replacing the disk containing
the physical volume. Detaching a link to a physical volume is a temporary
operation, not a permanent one. If you want to permanently remove
a link or physical volume from the volume group, use vgreduce instead, as described in “Removing a Disk from a Volume Group”. To detach a link to a physical volume, use the -a option to pvchange. For example, to
disable the link through the device /dev/disk/disk33, enter the following command: # pvchange -a n /dev/disk/disk33 |
If you are using LVM's alternate links for
multipathed disks, each link uses a different legacy device files.
In that situation, to detach all links to a physical volume, use N as the argument to the -a option: # pvchange -a N /dev/dsk/c5t0d0 |
Detaching one or more links to a physical volume
does not necessarily cause LVM to stop using that physical volume
entirely. If the detached link is the primary path to the device,
LVM begins using any available alternate link to it. LVM stops using
the physical volume only when all the links to it are detached. If all the links to a device are detached, the
associated physical volume becomes unavailable to the volume group.
The links remain associated with the volume group but LVM does not
send any I/O requests to the physical volume until it is reattached.
This means that the data on that physical volume becomes temporarily
unavailable; consequently, you must make sure that any availability
requirements for that data can be satisfied by mirroring before you
make the device unavailable by detaching it. Detaching a link does not disable sparing. That
is, if all links to a physical volume are detached and a suitable
spare physical volume is available in the volume group, LVM uses it
to reconstruct the detached disk. For more information on sparing,
see “Increasing Disk Redundancy Through Disk Sparing”. You can view the LVM status of all links to a
physical volume using vgdisplay with the -v option. Restoring a detached link to a physical volume,
or reattaching it, makes that link
available to the volume group. LVM can begin using that link as necessary
to access the disk. To reattach a specific path to a physical volume,
use the pvchange command with the -a option. For example, enter the following command: # pvchange -a y /dev/dsk/c5t0d0 |
Because detaching a link to a physical volume
is temporary, all detached links in a volume group are reattached
when the volume group is activated, either at boot time or with an
explicit vgchange command, such as the following: # vgchange -a y /dev/vg02 |
Creating an Alternate Boot Disk | |
| | | | | NOTE: Version 2.x volume groups do not support bootable
physical volumes. You cannot create an alternate boot disk in a Version
2.x volume group. | | | | |
With non-LVM disks, a single root disk contains
all the attributes needed for boot, system files, primary swap, and
dump. Using LVM, a single root disk is replaced by a pool of disks,
a root volume group, which contains
all of the same elements but allowing a root logical volume, a boot
logical volume, a swap logical volume, and one or more dump logical
volumes. Each of these logical volumes must be contiguous, that is,
contained on a single disk, and they must have bad block relocation
disabled. (Other noncontiguous logical volumes can be used for user
data.) For more information on the swap and dump devices and their
configuration, see HP-UX System Administrator's Guide:
Configuration Management. The root logical volume contains the operating
system software and the root file system (/)..
The boot logical volume contains the boot file system (/stand). You can combine the root and boot logical volumes into a single
logical volume or keep them separate. Whether you use a single combined
root-boot logical volume, or separate root and boot logical volumes,
the logical volume used to boot the system must be the first logical
volume on its physical volume. It must begin at physical extent 0000
to boot the system in maintenance mode. If you newly install your HP-UX system and choose
the LVM configuration, a root volume group is automatically configured
(/dev/vg00), as are separate root (/dev/vg00/lvol3) and boot (/dev/vg00/lvol1) logical volumes. If you currently have a combined root and boot
logical volume and you want to reconfigure to separate them after
creating the boot logical volume, use the lvlnboot command with the -b option to define the boot logical
volume to the system, taking effect the next time the system is booted. The swap logical volume is the system’s
primary swap area and is typically used for dump. The swap logical
volume is often on the same physical disk as the root logical volume.
However, you can configure it (and the dump logical volumes) on a
different physical disk than the root logical volume. If you create your root volume group with multiple
disks, use the lvextend command to place the boot,
root, and primary swap logical volumes on the boot disk. To create a new root volume group with an alternate
boot disk, follow these steps: Create
a bootable physical volume. On an HP Integrity server,
partition the disk using the idisk command and
a partition description file, then run insf as
described in “Mirroring the Boot Disk on HP Integrity Servers”. Run pvcreate with the -B option. On an HP Integrity server,
use the device file denoting the HP-UX partition: # pvcreate -B /dev/rdisk/disk6_p2 |
On an HP 9000 server, use the device file for the entire
disk: # pvcreate -B /dev/rdisk/disk6 |
Create a directory for the
volume group. For example: Create a device file named group in the previously described directory as follows: # mknod /dev/vgroot/group c 64 0xnn0000 |
Create
the root volume group, specifying each physical volume to be included,
as follows: # vgcreate /dev/vgroot /dev/disk/disk6 |
Place
boot utilities in the boot area as follows: # mkboot /dev/rdisk/disk6 |
Add an
autoboot file to the disk boot area as follows: # mkboot -a "hpux" /dev/rdisk/disk6 |
Create the boot logical volume.
To create a boot logical volume named bootlv with
size 512 MB, enter the following commands: # lvcreate -C y -r n -n bootlv /dev/vgroot
# lvextend –L 512 /dev/vgroot/bootlv /dev/disk/disk6 |
Create the primary swap logical
volume. For example, to create a primary swap logical volume named swaplv with size 2 GB on the same disks as the boot logical
volume, enter the following commands: # lvcreate -C y –r n -n swaplv /dev/vgroot
# lvextend –L 2048 /dev/vgroot/swaplv /dev/disk/disk6 |
Create the root logical volume.
For example, to create a root logical volume named rootlv with size 1 GB, enter the following commands: # lvcreate -C y –r n -n rootlv /dev/vgroot
# lvextend –L 1024 /dev/vgroot/rootlv /dev/disk/disk6 |
Specify that bootlv is the boot logical volume as follows: # lvlnboot -b /dev/vgroot/bootlv |
Specify that rootlv is the root logical volume as follows: # lvlnboot -r /dev/vgroot/rootlv |
Specify that swaplv is the primary swap logical volume as follows: # lvlnboot -s /dev/vgroot/swaplv |
Specify that swaplv is also to be used for dump as follows: # lvlnboot -d /dev/vgroot/swaplv |
Verify the configuration as
follows: # lvlnboot -v /dev/vgroot
Boot Definitions for Volume Group /dev/vgroot:
Physical Volumes belonging in Root Volume Group:
/dev/disk/disk6 -- Boot Disk
Boot: bootlv on: /dev/disk/disk6
Root: rootlv on: /dev/disk/disk6
Swap: swaplv on: /dev/disk/disk6
Dump: swaplv on: /dev/disk/disk6, 0
|
Once the boot and root logical
volumes are created, create file systems for them. For example: # mkfs –F hfs /dev/vgroot/rbootlv
# mkfs –F vxfs /dev/vgroot/rrootlv |
| | | | | NOTE: On HP Integrity servers, the boot file system
can be VxFS. Enter the following command:# mkfs –F vxfs /dev/vgroot/rbootlv |
| | | | |
Mirroring the Boot Disk | |
After you create mirror copies of the root, boot,
and primary swap logical volumes, if any of the underlying physical
volumes fail, the system can use the mirror copy on the other disk
and continue. When the failed disk comes back online, it is automatically
recovered, provided the system has not been rebooted. If the system reboots before the disk is back online,
reactivate the volume group to update the LVM data structures that
track the disks within the volume group. You can use vgchange
-a y even though the volume group is already active. For example, you can reactivate volume group vg00 by entering the following command: # vgchange -a y /dev/vg00 |
As a result, LVM scans and activates all available
disks in the volume group vg00, including the
disk that came online after the system rebooted. The procedure for creating a mirror of the boot
disk is different for HP 9000 and HP Integrity servers. HP Integrity
servers use partitioned boot disks. Mirroring the Boot Disk on HP 9000 ServersTo set up a mirrored root configuration, you must
add a disk to the root volume group, mirror all the root logical volumes
onto it, and make it bootable. For this example, the disk to be added
is at path 0/1/1/0.0x1.0x0 and has device special files named /dev/rdisk/disk4 and /dev/disk/disk4. Follow these steps: Mirroring the Boot Disk on HP Integrity ServersThe procedure to mirror the root disk on Integrity
servers is similar to the procedure for HP 9000 servers. The difference
is that Integrity server boot disks are partitioned; you must set
up the partitions, copy utilities to the EFI partition, and use the
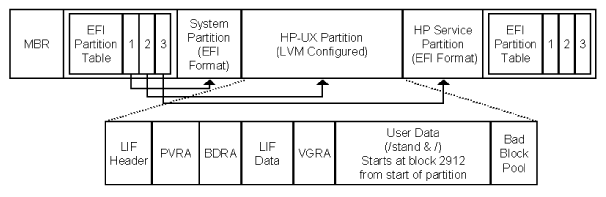
HP-UX partition device files for LVM commands. Figure 3-1shows
the disk layout of a boot disk. The disk contains a Master Boot Record
(MBR) and EFI partition tables that point to each of the partitions.
The idisk command creates the partitions (see idisk(1M)). For this example, the disk to be added is at hardware
path 0/1/1/0.0x1.0x0, with device special files named /dev/disk/disk2 and /dev/rdisk/disk2. Follow these steps: Partition
the disk using the idisk command and a partition
description file. Create
a partition description file. For example: In this example, the partition description file
contains the following information: 3
EFI 500MB
HPUX 100%
HPSP 400MB |
The values in the example represent a boot disk
with three partitions: an EFI partition, an HP-UX partition, and an
HPSP. Boot disks of earlier HP Integrity servers might have an EFI
partition of only 100 MB and might not contain the HPSP partition. Partition
the disk using idisk and your partition description
file as follows: # idisk -f /tmp/idf -w /dev/rdisk/disk2 |
To verify
that your partitions are correctly laid out, enter the following command:
Create
the device files for all the partitions. For example: # insf -e -H 0/1/1/0.0x1.0x0 |
The following device files now exist for this disk: /dev/[r]disk/disk2 (this refers to the entire disk)
/dev/[r]disk/disk2_p1(this refers to the efi partition)
/dev/[r]disk/disk2_p2(this will be the hp-ux partition)
/dev/[r]disk/disk2_p3(this refers to the service partition) |
Create
a bootable physical volume using the device file denoting the HP-UX
partition. For example: # pvcreate -B /dev/rdisk/disk2_p2 |
Add the
physical volume to your existing root volume group as follows: # vgextend vg00 /dev/disk/disk2_p2 |
Place
boot utilities in the boot area. Copy EFI utilities to the EFI partition,
and use the device special file for the entire disk as follows: # mkboot -e -l /dev/rdisk/disk2 |
Add
an autoboot file to the disk boot area as follows: # mkboot -a "hpux" /dev/rdisk/disk2 |
| | | | | NOTE: If you expect to boot from this disk only when you lose quorum,
you can use the alternate string hpux –lq to disable quorum checking. However, HP recommends configuring your
root volume group to minimize quorum losses, by using at least three
physical volumes and no single points of failure, as described in “Planning for Recovery”. | | | | |
The logical volumes on the
mirror boot disk must be extended in the same order that they are
configured on the original boot disk. Determine the list of logical
volumes in the root volume group and their order. For example: # pvdisplay -v /dev/disk/disk0_p2 | grep 'current.*0000 $'
00000 current /dev/vg00/lvol1 00000
00010 current /dev/vg00/lvol2 00000
00138 current /dev/vg00/lvol3 00000
00151 current /dev/vg00/lvol4 00000
00158 current /dev/vg00/lvol5 00000
00159 current /dev/vg00/lvol6 00000
00271 current /dev/vg00/lvol7 00000
00408 current /dev/vg00/lvol8 00000 |
Mirror
each logical volume in vg00 (the root volume group)
onto the specified physical volume. For example: |
# lvextend –m 1 /dev/vg00/lvol1 /dev/disk/disk2_p2
The newly allocated mirrors are now being synchronized.
This operation will take some time. Please wait ....
# lvextend –m 1 /dev/vg00/lvol2 /dev/disk/disk2_p2
The newly allocated mirrors are now being synchronized.
This operation will take some time. Please wait ....
# lvextend –m 1 /dev/vg00/lvol3 /dev/disk/disk2_p2
The newly allocated mirrors are now being synchronized.
This operation will take some time. Please wait ....
# lvextend –m 1 /dev/vg00/lvol4 /dev/disk/disk2_p2
The newly allocated mirrors are now being synchronized.
This operation will take some time. Please wait ....
# lvextend –m 1 /dev/vg00/lvol5 /dev/disk/disk2_p2
The newly allocated mirrors are now being synchronized.
This operation will take some time. Please wait ....
# lvextend –m 1 /dev/vg00/lvol6 /dev/disk/disk2_p2
The newly allocated mirrors are now being synchronized.
This operation will take some time. Please wait ....
# lvextend –m 1 /dev/vg00/lvol7 /dev/disk/disk2_p2
The newly allocated mirrors are now being synchronized.
This operation will take some time. Please wait ....
# lvextend –m 1 /dev/vg00/lvol8 /dev/disk/disk2_p2
The newly allocated mirrors are now being synchronized.
This operation will take some time. Please wait ....
|
|
| | | | | TIP: To shorten the time required to synchronize the
mirror copies, use the lvextend and lvsync command options introduced in the September 2007 release of HP-UX
11i Version 3. These options enable you to resynchronize logical volumes
in parallel rather than serially. For example:# lvextend -s –m 1 /dev/vg00/lvol1 /dev/disk/disk2_p2
# lvextend -s –m 1 /dev/vg00/lvol2 /dev/disk/disk2_p2
# lvextend -s –m 1 /dev/vg00/lvol3 /dev/disk/disk2_p2
# lvextend -s –m 1 /dev/vg00/lvol4 /dev/disk/disk2_p2
# lvextend -s –m 1 /dev/vg00/lvol5 /dev/disk/disk2_p2
# lvextend -s –m 1 /dev/vg00/lvol6 /dev/disk/disk2_p2
# lvextend -s –m 1 /dev/vg00/lvol7 /dev/disk/disk2_p2
# lvextend -s –m 1 /dev/vg00/lvol8 /dev/disk/disk2_p2
# lvsync -T /dev/vg00/lvol* |
| | | | |
Update
the root volume group information as follows: Verify that the mirrored disk
is displayed as a boot disk and that the boot, root, and swap logical
volumes appear to be on both disks as follows: Specify the mirror disk as
the alternate boot path in nonvolatile memory as follows: # setboot –a 0/1/1/0.0x1.0x0 |
Add a
line to /stand/bootconf for the new boot disk
using vi or another text editor as follows: # vi /stand/bootconf
l /dev/disk/disk2_p2 |
Where the literal “l”
(lower case L) represents LVM.
|