| United States-English |
|
|
|
Ignite-UX Administration Guide: for HP-UX 11i > Chapter 10 Booting and Installing HP-UX on Clients Using the ServerConfiguring the Installation |
|
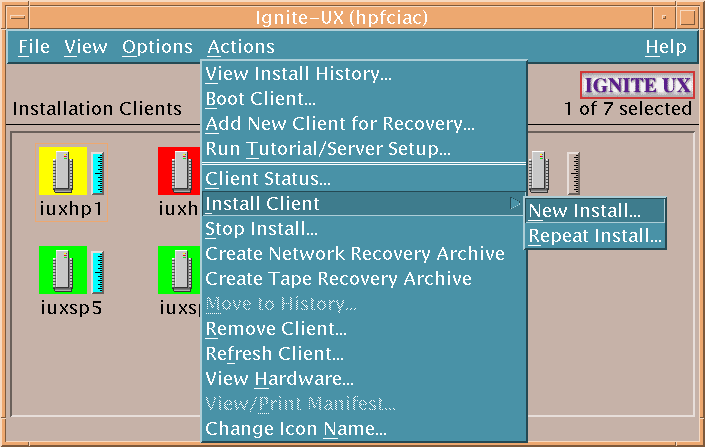
To begin the installation, select a client by clicking on its icon, and then select one of the following from the Actions menu:
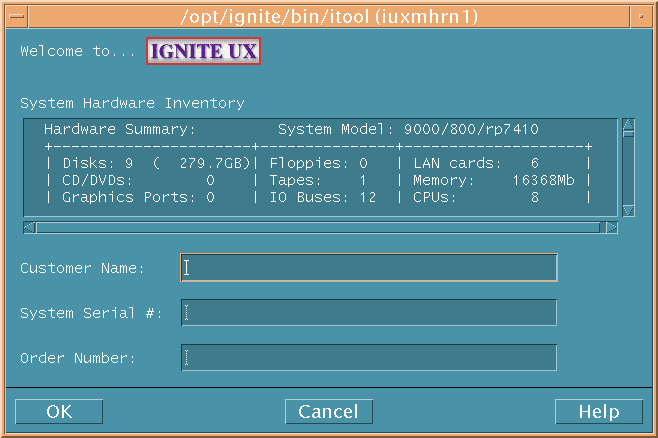
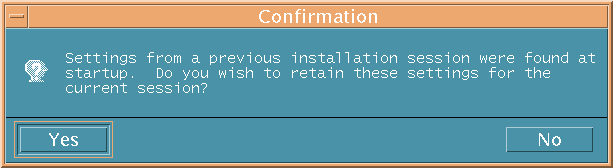
The new installation procedure follows a linear path until the client installation configuration interface is displayed . At that point, the amount of configuring done is at your discretion. The system hardware inventory of the target system is displayed when a new installation is initiated. Check to make sure the hardware connected to the client is present and displayed information is correct. Notice that for Ignite servers running HP-UX 11i v3, all paths to each device and the WWID are displayed. This information is available by scrolling down in the System Hardware Inventory on the GUI, or by clicking the [ H/W Details ] button on the TUI. Select OK after checking the hardware inventory and optionally entering information. If you previously installed this client, you are asked if you want to use the last installation configuration used by the Ignite-UX server, as shown in Figure 10-13. Respond Yes to repopulate all GUI fields with the configuration used in the previous session; respond No to create an entirely new configuration beginning with the defaults determined by Ignite-UX.
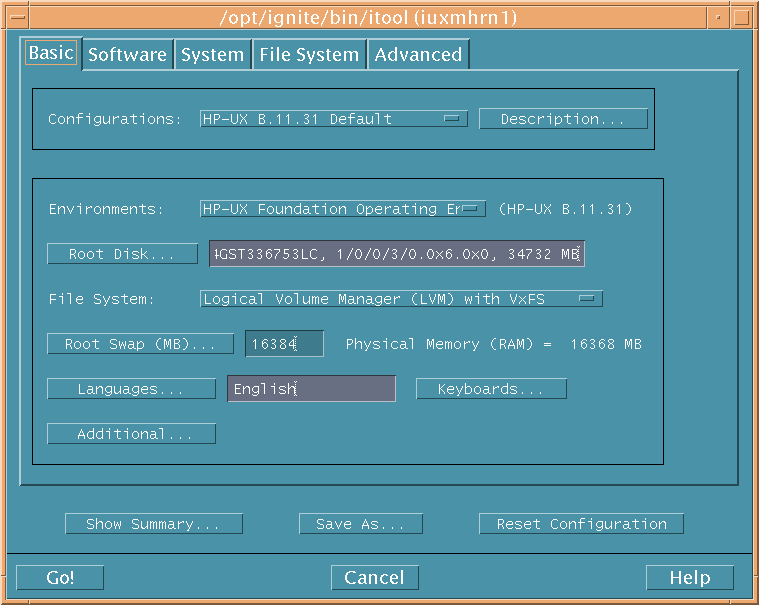
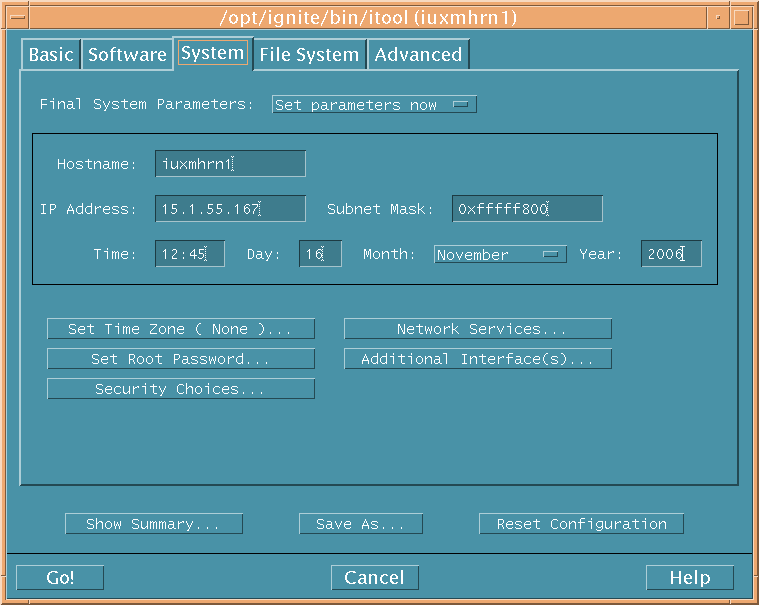
The client installation configuration user interface is then presented (Figure 10-14). Not all fields in the configuration interface require attention. In fact, a quick installation can be launched by selecting the default configuration for your version of HP-UX and then selecting Go!. Modify the fields of the configuration interface at your discretion. Navigate between the tabs by clicking on the tab name. At a minimum, you may want to define the root password by using the Set Root Password... button on the System tab, and set the DNS information located via the Network Services... button on the System tab. The Show Summary, Save As, Reset Configuration, Go!, Cancel, and Help buttons are available from all tabs with the same functionality. Table 10-1 Functions Available From All Tabs
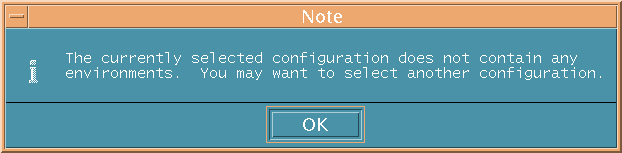
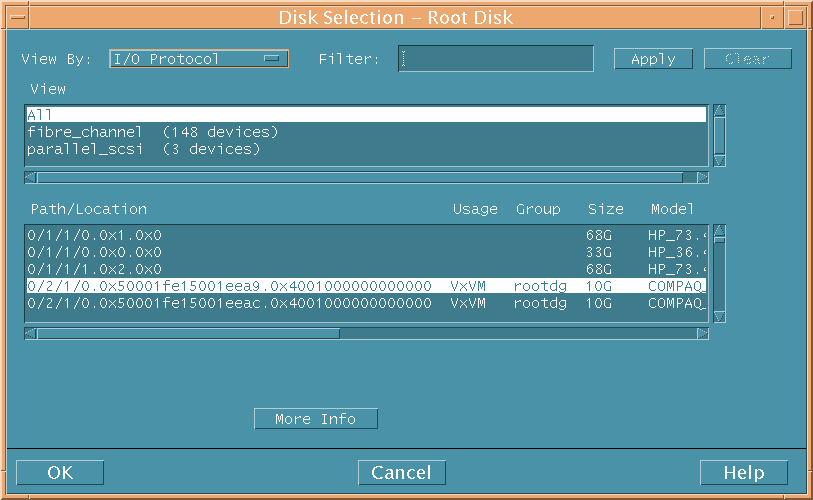
The Basic tab, shown in Figure 10-14, is displayed as default. The elements on this tab are explained in the subsections that follow. Click the selection list button adjacent to Configurations: and select the configuration you want to use for this installation. The configuration options presented are stored on the Ignite-UX server in the /var/opt/ignite/INDEX file. If the selected configuration has no corresponding environments, you will get the message shown below. Select another configuration for installation. If you booted the client with an HP-UX version that is not configured on the server (Figure 10-4), you will not be able to install the client with that version of HP-UX using this Ignite-UX server. Click the selection list button adjacent to Environments: and select the operating system or HP-UX 11i OE that you want to install from the list. This may include 64-bit or 32-bit operating system versions. The choices and defaults depend on the releases available on the Ignite-UX server. Golden images may also be available if any have been created and their configurations have been added to the server’s /var/opt/ignite/INDEX file. Click this button to determine the current root disk or to change the root disk. Select a disk from the list of available disks, then click OK. For information on supported devices, see “Supported Peripherals ”. The Disk Selection – Root Disk dialog box has a View By: pulldown and a Filter: text box that allows you to control the display of disks. The selection in the View By: pulldown controls the display in the View window. The selection in the View window controls the display in the Path/Location window. Available selections in the View By: pulldown are:
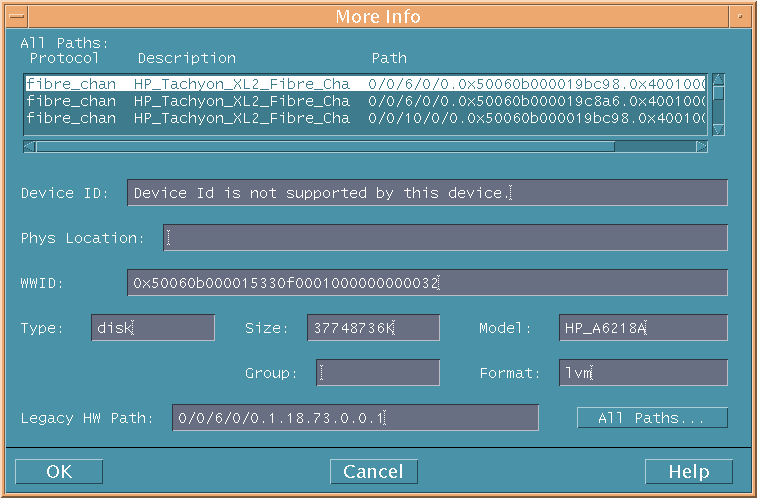
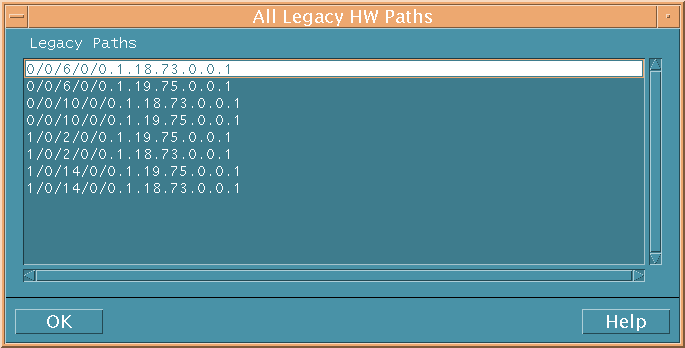
The Filter text box will limit what's displayed in the windows by only displaying results with the filter text in them. Enter the filter text and then select Apply. To undo the filter, select Clear. The filter acts on the Path/Location window for all Views except Disks/Paths, where it acts on the View window. The Path/Location window displays a great deal of information, but you have to scroll horizontally to see all the fields. The fields displayed in the Path/Location window are: Path/Location, Usage, Group, Size, Model, WWID, Existing (preexisting data), Legacy Path, and Device ID. The Filter is able to screen all these fields. The Disk Selection – Root Disk dialog box displays every path for each disk, therefore disks with multiple paths are listed multiple times. To get a concise listing of all the paths for a single device, use the Disks/Paths view or click the More Info button. Note that devices blocked from Ignite-UX start-up inventory will not be listed. In addition to listing all the paths for a particular device, the More Info button provides detailed information, such as Device ID, and WWID. The Legacy HW Path window is not available on systems running HP-UX 11i v2 and earlier. The Legacy HW Path will update based on the lunpath hardware path currently selected in the selection list window. For a concise list of all the legacy hardware paths leading to the device, select the All Paths... button, only available on systems running HP-UX 11i v3 and later. Click the selection list button adjacent to File System:, and then select from the list of available file system architectures. The list of file system choices that appears is dependent on the hardware architecture of the client. By default the choices are outlined in the following table and descriptions follow. Table 10-2 File System Default Choices
For guidelines in planning file system layouts and for disk-management strategies, see the HP-UX System Administrator’s Guide for HP-UX 11i v3, or Managing Systems and Workgroups: A Guide for HP-UX System Administrators. Additionally, see the section “File System Tab ” for detailed information on file system configuration.
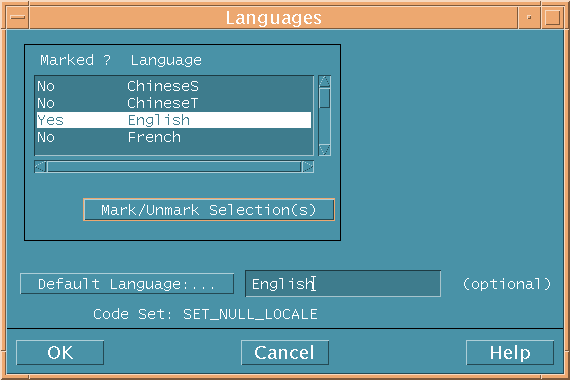
The amount of root swap space depends on the applications being installed. You can choose to use the default that Ignite-UX computes based on available memory on the client, or you can click Root Swap (MB)... and select from the choices that appear in the list. You can also modify the adjacent field directly by typing in the amount you want. The swap is rounded down to a multiple of 4 MB or the LVM extent size. For information regarding computing swap space, see the HP-UX System Administrator’s Guide for HP-UX 11i v3, or Managing Systems and Workgroups: A Guide for HP-UX System Administrators. The languages available with your HP-UX system are listed when you click Languages.... The default language, which was set when the GUI was started for the first time, appears in the adjacent field. Select the language you want as the default for the client, if it is other than the current default language. You can select more than one language by double-clicking on each item. To select a range of items in the list, you click and hold the mouse button, drag the pointer down within the dialog box, then click mark/unmark. Each language has a corresponding locale (language variant), which describes the system management of a language for doing the following:
Click Default Language... to see the Default Language Choices (Figure 10-19). They are listed in two columns: Language and Locale. Each language may have more than one way of representing itself on the system. If this is the case, there will be multiple locale entries for the same language. The locale determines how languages are activated, and are reflected adjacent to Code Set:, as follows:
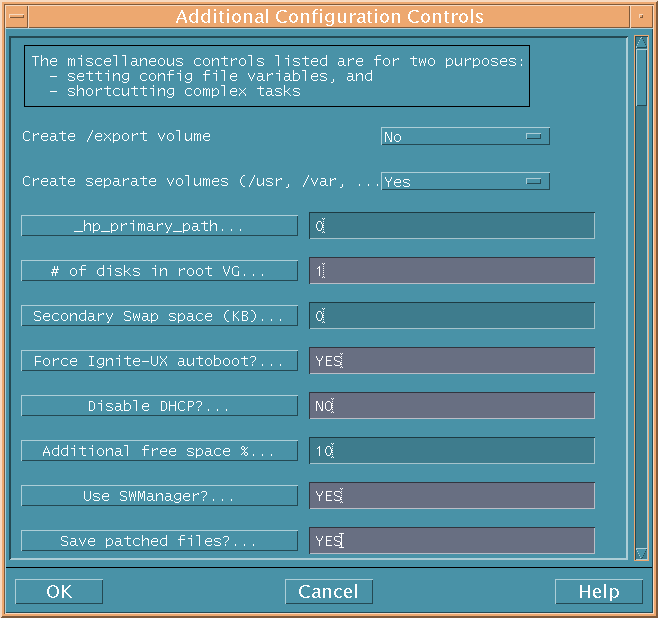
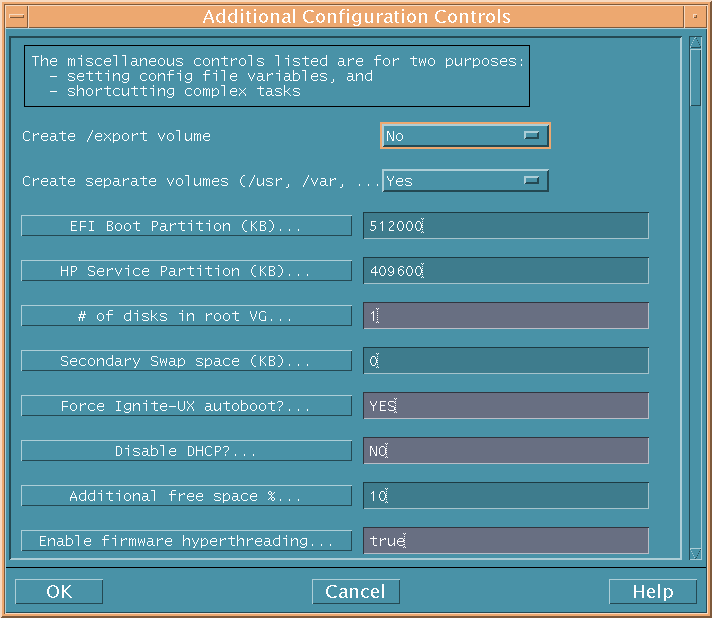
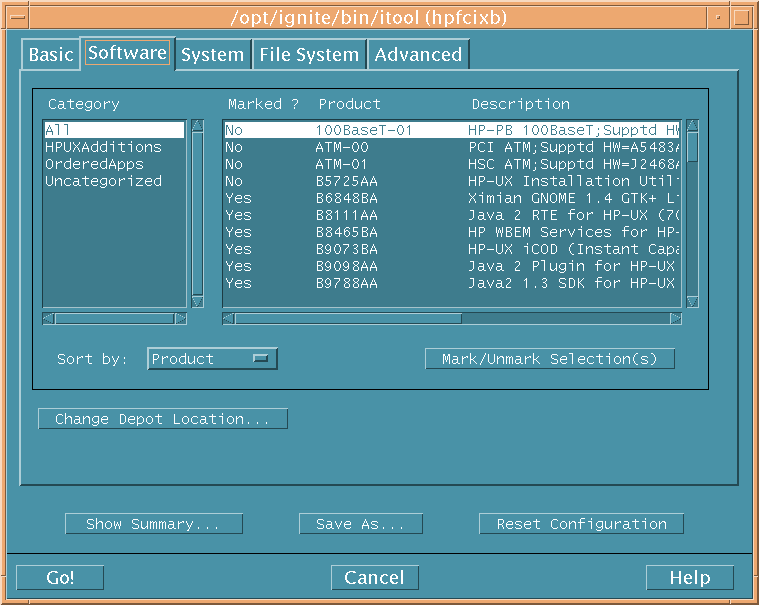
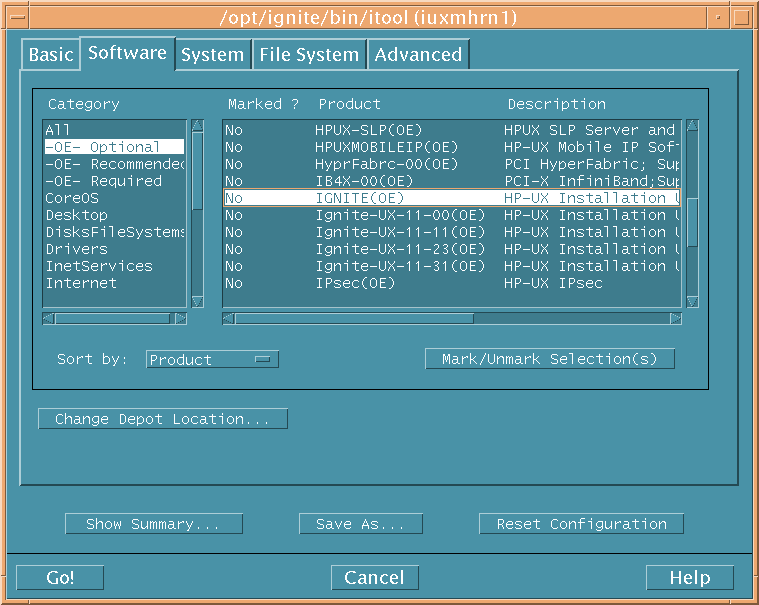
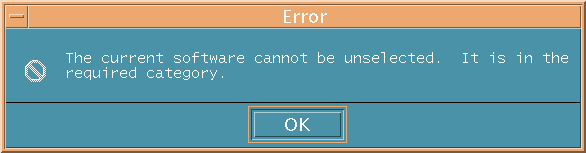
For information regarding other methods of setting the language environment, see geocustoms(1M) and HP CDE Getting Started Guide. Click this button to select the type of keyboard to be used on the client. Otherwise, the default selection is used. The selected keyboard language name is stored in the /etc/kbdlang file. If you have incorrectly set the language, you can quickly recover by removing this file. Click Additional... to select among certain preconfigured use models and variables from your current configuration files. The buttons available are determined from the variables in your configuration file and enable you to choose a setting for each variable. If for example you are using LVM, you will see selections for easily setting up multiple disks, striping, and file system creation. For more information, see instl_adm(4). The example Additional Configuration Controls dialog box below illustrates the options for a different system. Systems with firmware hyperthreading have it enabled by default. Use the Software tab to choose from the applications you configured when you set up your Ignite-UX server. You can access a specific depot and you can change depot locations. This display does not dynamically update from a newly selected depot. When you choose a new depot, it must be identical in content to the current one. If not, use make_config on the Ignite-UX server to configure the new depot prior to invoking Ignite-UX. An example of what you might see on the Software tab is shown in Figure 10-22 for HP-UX 11i v1 and 11i v2 systems, and Figure 10-23 for HP-UX 11i v3 systems. Select a topical category to display the products that are available. When All is selected, all software bundles in the depot are displayed. Selecting a category other than All will shorten the list. Additional categories may be visible if defined by any custom configuration files. Starting with HP-UX 11i v3, software bundles are organized by the categories "optional", "recommended", and "required", instead of "selectable", "default-installed", and "always-installed". See the HP-UX Installation and Update Guide available from http://www.docs.hp.com/ for a detailed description of the software bundles and OE structure in your version of HP-UX. Note that Ignite-UX is in the "selectable" or "optional" category. If you want Ignite installed on the client system, you must select it for installation. You can select all software in the optional category by marking the "-OE- Optional" product, and all software in the recommended category by marking "-OE- Recommended". Click on a product in the list to select it. To change the status in the Marked ? column, use the Mark/Unmark Selection(s) button, or double-click the product. If you attempt to unmark a product that must be installed, you will get message similar to the following: The Marked ? column status can be:
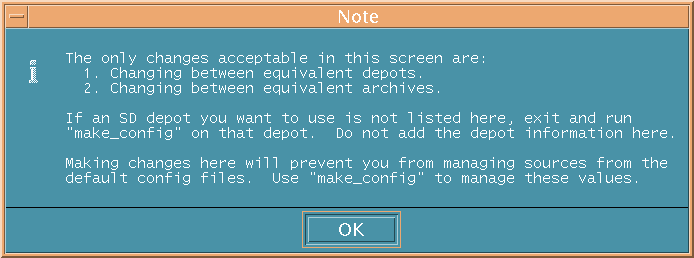
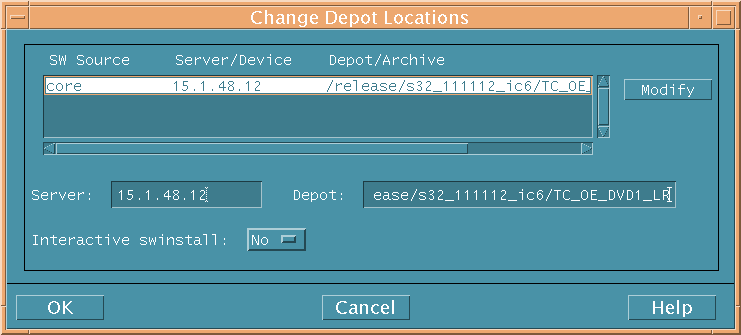
For more information, see instl_adm(4). Your ability to select and deselect installation software is dependent upon what type bundle the software is in (for example, "Required") and other software selections you have made. See the HP-UX Installation and Update Guide available from http://www.docs.hp.com/ for a detailed description of the software bundles and OE structure in your version of HP-UX. Select a column by which the product listings will be sorted. By default, the listings are sorted by Product. You can also perform a two-level sort. For example, you can sort first by Product and then by Marked to see all the products that are marked Yes listed in alphabetical order, followed by all the products marked No listed in alphabetical order. Select this button to change the location of the depot from which you are selecting software. Changing the depot location changes the source depot for all products. The following note is displayed when you click this button: Ignite-UX does not dynamically update from a newly selected depot. When you choose a new depot, it must be identical in content to the current one. If the new depot is not identical to the current one, use make_config on the Ignite-UX server to configure the new depot prior to invoking Ignite-UX. Use the Change Depots Locations dialog box to select a different depot. Use the Server: and Depot: text boxes to identify the new depot. Click Modify to update the depot information within the dialog box. Click OK to commit the modifications to the Ignite-UX server. If you are installing from a golden image, the Change Depot Locations dialog box allows you to modify the archive server and the archive path. If patches are kept in a separate depot, by default they are installed after the operating system. If there are multiple application depots to be installed, you may need to specify the installation order for the patches in a configuration file. For more information see, “Using Configuration Files”.
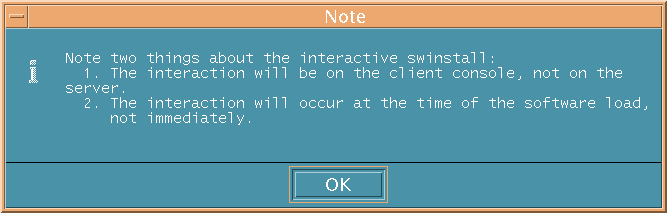
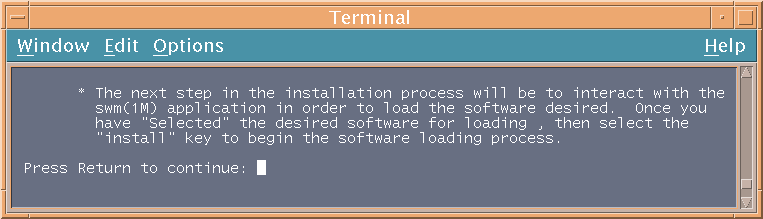
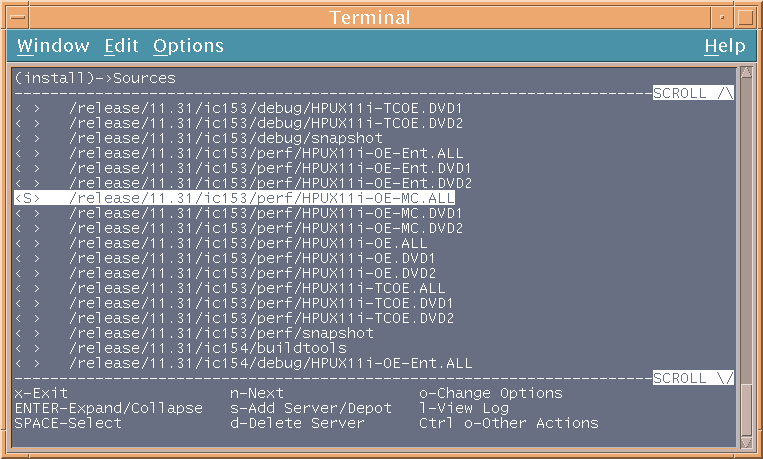
Interactive swinstall An interactive swinstall session allows you to select a depot, change installation options, and perform other software installation tasks from the console window immediately before the software load phase of the installation. After selecting an interactive swinstall session, the following message will be displayed. The installation will be interrupted at the start of the software load phase, and the following message will be displayed on the console screen. During interactive swinstall, you can choose a server, a depot, and individual bundles for installation. Scroll through the list using the arrow keys, and select a new depot for software installation by pressing the space bar. (Navigation help is always displayed at the bottom of the screen.) After selecting a depot, press n to view the software available within the depot. Select or deselect individual bundles with the space bar. Press i to continue the Ignite-UX installation. If you press x, you will receive this message: Would you like to exit, save or continue the job? [x]/s/c Press c to return to the swinstall session. Ignite-UX will check to ensure you have loaded some basic software, but in general, exiting without installing is not recommended. Use the System tab to specify the information unique to this client such as the hostname, IP address, root password, and the time zone. You can choose to set the System tab parameters now or at the first boot of the client. If you select first boot, you do not need to modify any parameter on the System tab now. Your client must have a unique system name. A hostname must fulfill the following conditions:
For more information, see hostname(1). Use this field to enter the IP address in the form: n.n.n.n, where each n is a number 0 through 255. To determine the IP address of an existing system, use nslookup. For example, if the hostname of the client is test, enter the following:
You can also use ping to determine the hostname, the IP address of a system, and if a given IP address is already in use. If you are in doubt, be sure to coordinate IP address allocation with your network administrator.
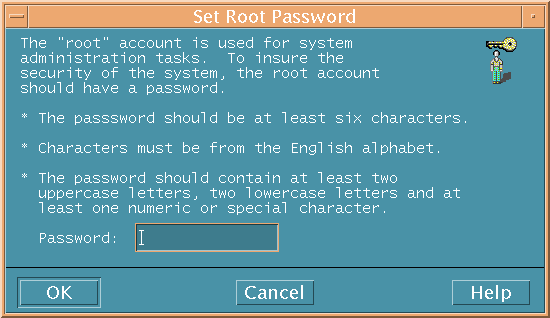
This field sets the subnet mask for the client system. The subnet mask is typically provided by your network administrator, and is in the form of an IP address or a corresponding hex number. For example: The time and day that is displayed for the client is dependent on the installation method. If you are installing from the server, the time is synchronized with the server; if you are installing from the client, it is set using the client’s hardware clock. If necessary, enter information for the Time, Day, and Year fields: For time, use the 24 hour format: hh:mm. Select the correct month by clicking the adjacent list button, and then selecting from the list. Edit other fields by using the Backspace and Delete keys. The time you set is automatically adjusted if you select a different time zone using the Set Time Zone... button described below. Click this button to display the time zone selections, as illustrated in Figure 10-32. Use the General Locations list button to select the client’s location, and then select the time zone. Click OK to set the value. The time and date on the System tab are adjusted to reflect the new time zone, and the TZ environment variable is set. To ensure the security of the client system, create a password for the root account by clicking this button. The Set Root Password dialog box is displayed, as shown in Figure 10-33. To strengthen security, HP recommends that you observe the following requirements when setting a password:
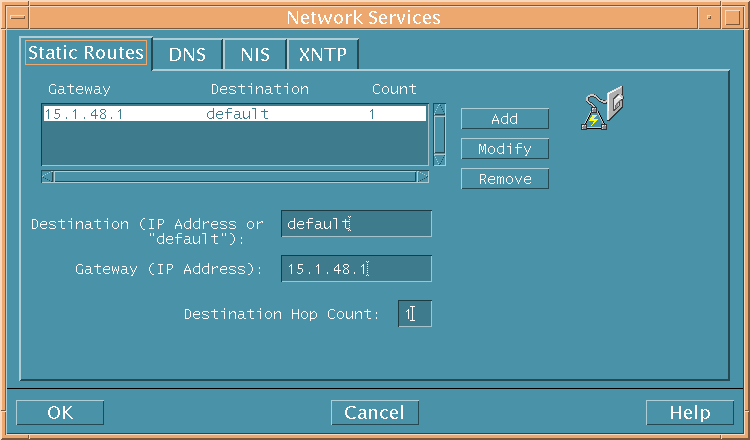
Click this button to configure the network services available to the client. Static Routes. If your network is divided into subnets, you will probably need to specify a gateway system to reach other subnets:
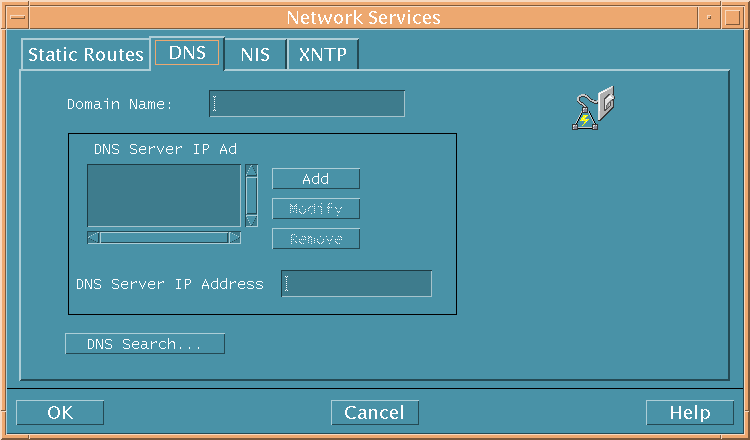
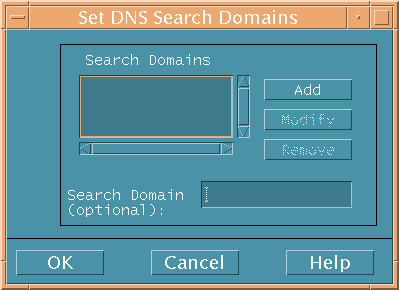
After you complete the appropriate fields on this tab, click Add or Modify to save the information. For more information, see routing(7). DNS. On the DNS tab, you can configure the domain name (an extension to the hostname, such as xx.corp.com) and the IP address of the domain name server. Recovery over the network requires the domain name and DNS server IP address to be set for the client now, unless the Final System Parameters list button on the System tab is set to Ask at first boot. The list of DNS servers by IP address is populated if they are predefined on the Ignite-UX server. Use the nslookup command on a running system to find this information if you need to add a DNS server to this list. Enter the IP address of the name server in the DNS Server IP Address text box. Use the Add, Modify, and Remove buttons to modify this list directly. Additionally, you can use the DNS Search... button to set optional DNS domains to be searched, as shown in Figure 10-36. The domains in this search list are used for hostname lookups. Up to six search domain entries are enabled, with a syntax like xx.corp.com. For the search to work properly, the first entry in the list should be the local domain for unqualified hostnames. You can add to or modify the domains to be searched by entering the text in the Search Domain field and clicking the appropriate button, Add or Modify. To remove a domain, select it from the list and click Remove.
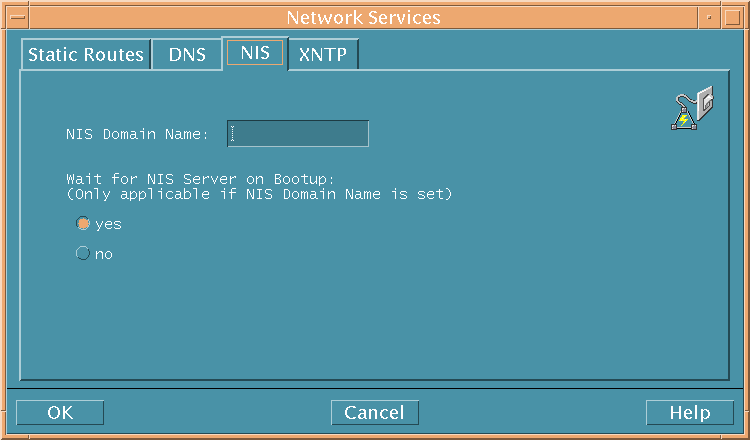
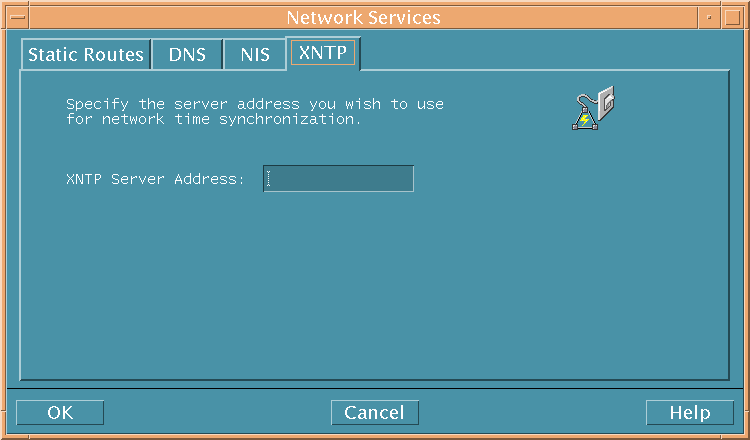
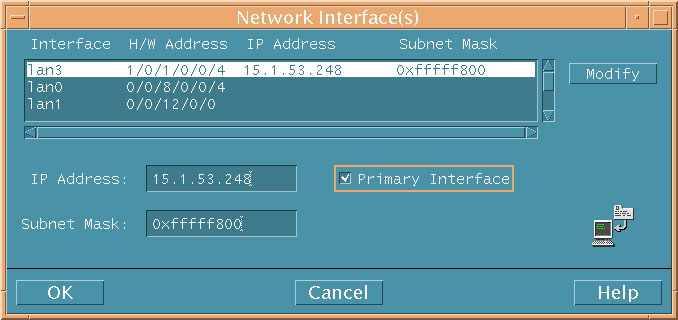
For more information, see resolver(4), Installing and Administering NIS Services or HP-UX IP Address and Client Management Administrator's Guide. NIS. It is common for the nonserver hosts in a network to be NIS clients. Whenever a process on an NIS client requests configuration information, it calls the NIS server instead of looking in its local configuration files. The set of configuration data maps shared by the servers and clients is called the NIS domain. For more information, see domainname(1), domainname(1M), and Installing and Administering NIS Services. XNTP. The xntpd daemon maintains system time, in agreement with Internet standard time servers. For more information, see xntpd(1M). Click this button on the System tab to identify additional LAN interface cards that exist in the client. You can add or change IP and subnet information as needed, and designate the primary LAN interface to be used.
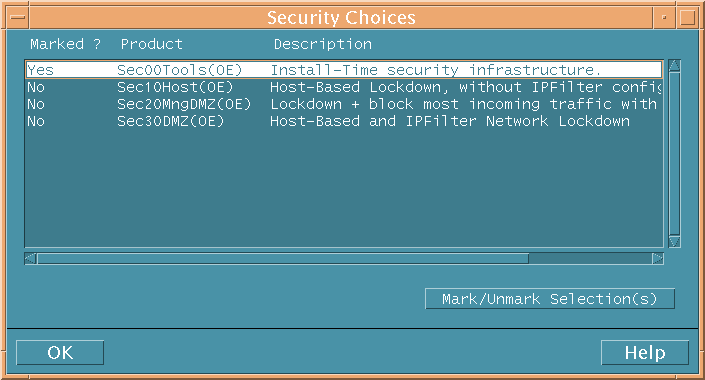
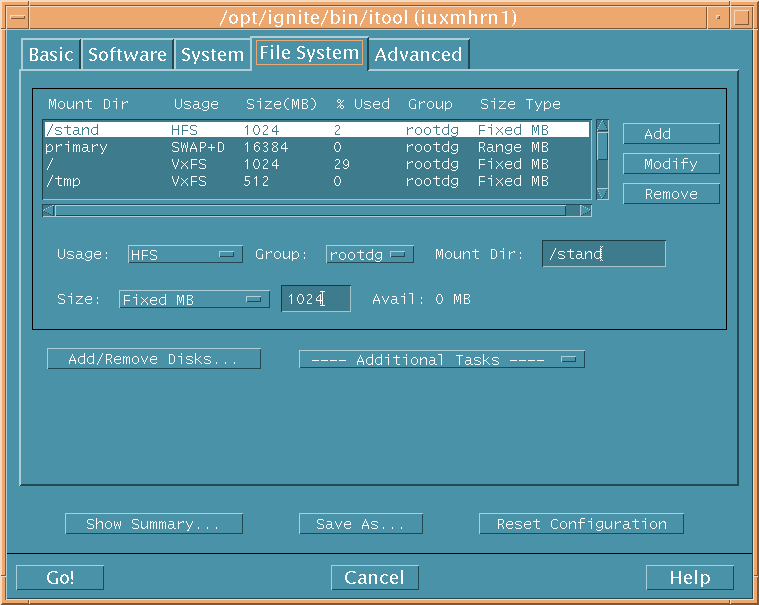
Click this button on the System tab to invoke the Security Choices dialog box. This button is available only if you have install-time security available in your configuration. The install-time security choices allow you to choose from several predefined security levels, thereby hardening the system. If you select a security choice, be sure to set the root password before you click Go!, or your system may be vulnerable. The File System tab enables you to do a variety of file system and disk configuration tasks. Its appearance depends on your file system selection on the Basic tab. The example in Figure 10-41 illustrates what you would see if you had selected LVM on a PA-RISC client.
Adding a new file system or changing an existing one are similar actions in that the same information is needed for both.
To add or change any of the file system configurations, use the following steps:
Additional requirements for specific file system layouts are as follows: Table 10-3 Volume Requirements for LVM and VxVM
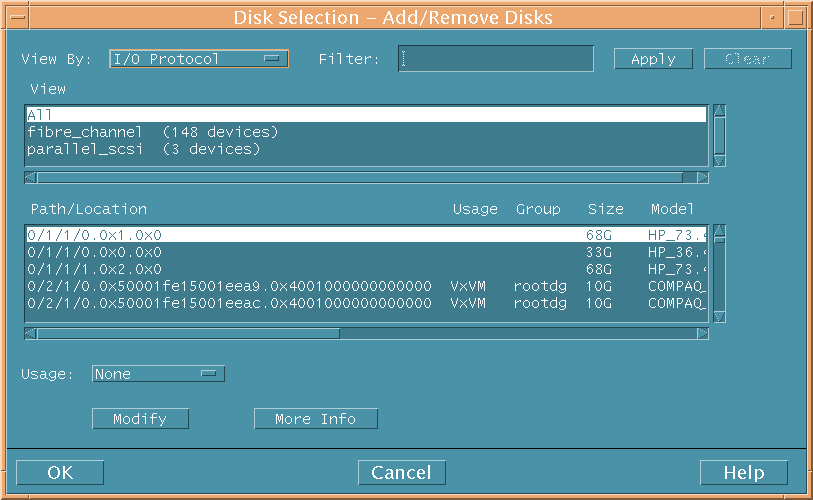
Selecting this button invokes a dialog box that enables you to do the following:
To change, add, or remove a disk from the client:
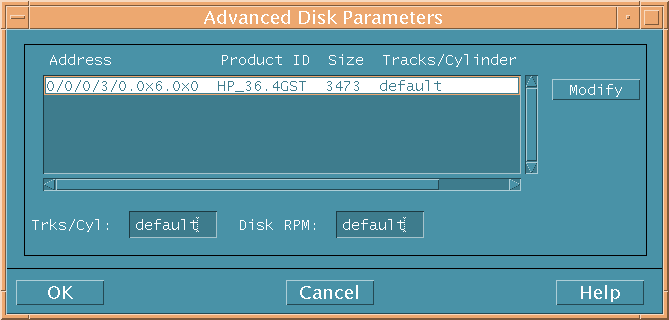
This button enables you to configure advanced information, if necessary, in the following categories: The selection of one of these categories results in a change to name of the button and a dialog box that enables you to change the parameters associated with the chosen category appears.
Disk Parameters - Follow these steps to further define the tracks per cylinder or revolutions per minute for each disk on the client using the Disk Parameters selection of the Additional Tasks button. Additionally, you have the option of initializing each disk.
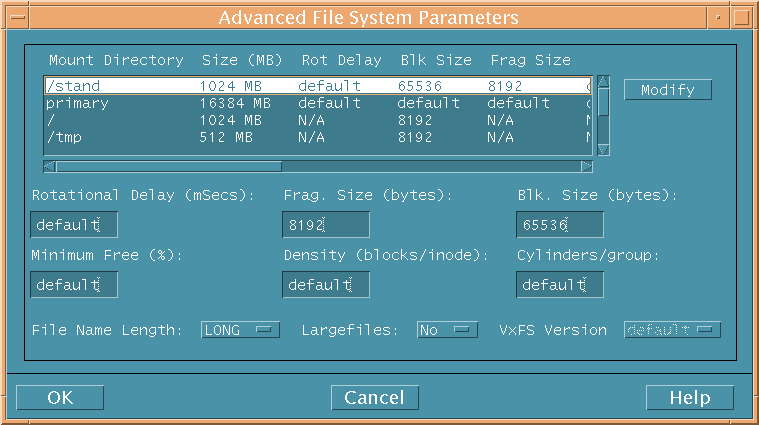
For more detailed information regarding these disk parameters, see mkfs_vxfs(1M) and mkfs_hfs(1M). File System Parameters - Several file systems are already defined by Ignite-UX, but you can modify them as follows to suit your environment.
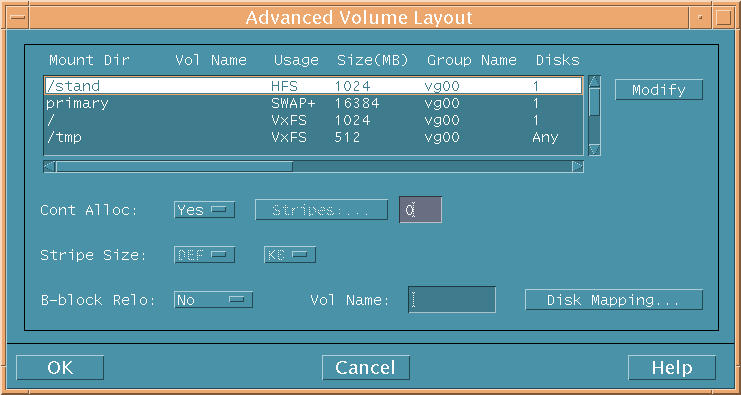
Volume Parameters - Follow these steps to modify the default volume values and perform detailed volume configurations for LVM and VxVM file systems.
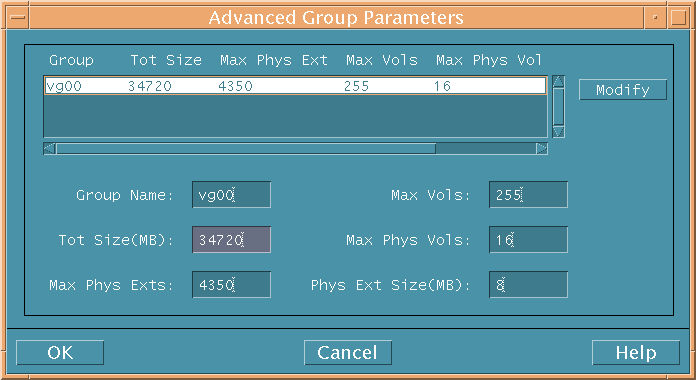
Group Parameters - You can set additional volume group parameters as follows to further define volumes.
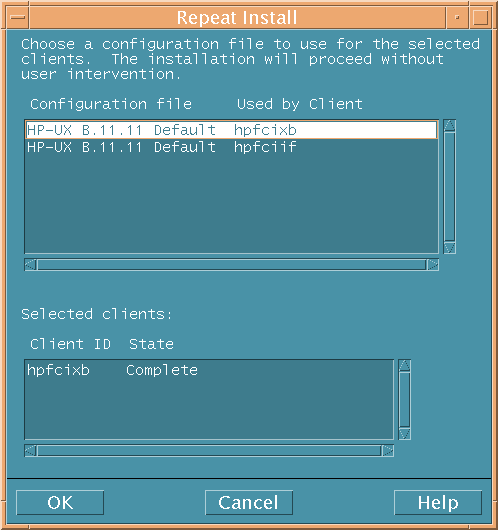
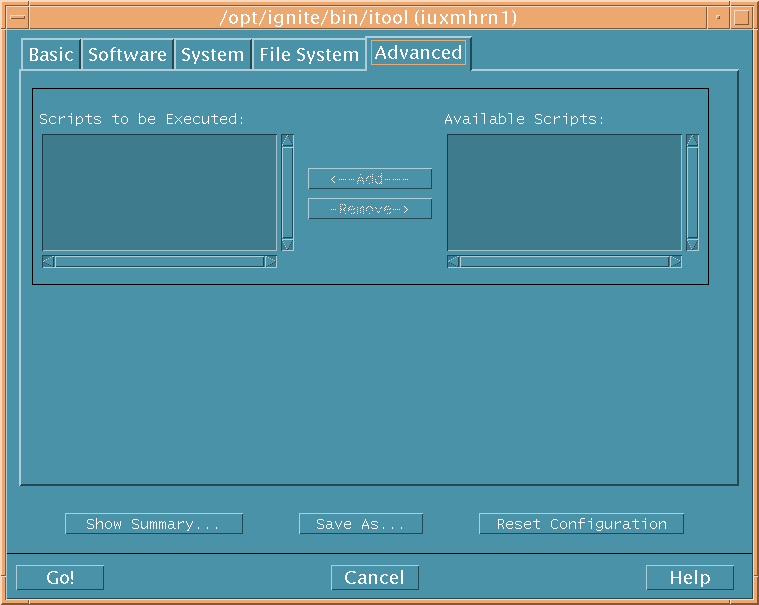
You can use the Advanced tab, as shown in Figure 10-47, to activate any HP or custom scripts that you might want to run on the client after the installation has completed. For example, you could include a script to install additional software from other depots, or one that contains specific system configuration changes for the intended use of the client. Two different lists appear on this tab, Scripts to be Executed: and Available Scripts:. The scripts that populate the Available Scripts list are derived from the /var/opt/ignite/INDEX file clauses identified by the scripts keyword. When you add new scripts to the /var/opt/ignite/INDEX file using manage_index, they are automatically added to this list and are available for use the next time you invoke the Ignite-UX GUI. For example, if you want to add a script called run_fsck located in /var/opt/ignite/scripts, you would use the following command: manage_index -a -s "/var/opt/ignite/scripts/run_fsck" For more information, see manage_index(1M). Populate the Scripts to be Executed: list by adding or removing scripts from the Available Scripts: list. Descriptions for each action follow. To add a script for Ignite-UX to execute after the installation, select the item from Available Scripts: column, then click <---Add---. For more information regarding the use of scripts to automate Ignite-UX tasks, see Chapter 12: “Customizing Your Installation”, and see instl_adm(4). See also the Ignite-UX Custom Configuration Files document, available on the Information Library page of the Ignite-UX website at Once you have successfully installed a client, you have built a repeatable client installation configuration. You can choose to use any past configuration to install or reinstall a client. This method requires no intervention, which enables you to launch multiple installations quickly. Begin a repeat installation by selecting Actions The Configuration File list (Figure 10-48) is populated by the last installation configuration, and all those that you have created using the Save As...button that is on all of the installation configuration tabs. These saved installation configurations are stored in /var/opt/ignite/saved_cfgs/. If there are no saved configurations, the Repeat Install action is not available and you must begin a new installation as described in “New Installation”. Select one of the configurations listed by clicking on it, then click OK. Ignite-UX begins the installation process with a confirmation query to alert you that the clients appearing in the Selected Clients list are about be installed. Confirm or cancel the installation of the listed clients using the appropriate button. |
|||||||||||||||||||||||||||||||||||||||||||||||||||||||||||||||||||||||||||||||||||||||||||||||||||||||||||||||||||||||||||||||||||||||||||||||||||||||||||||||||||||||||||||||||||||||||||||||||||||||||||||||
|
|||||||||||||||


 Install Client