
13.5. Programming in Tcl and Tk
Tool Command Language, or Tcl, (pronounced "tickle") is a simple, interpreted language that is similar, in some respects, to the Bourne shell or Perl. The real benefit of Tcl is that it can be extended as well as embedded in other applications. It is particularly popular when used with the Tk extension, which offers about the simplest interface you could get to program with windows. As an additional benefit, you can run your Tcl/Tk problems without much hassle on both Unix, Windows, and the Macintosh.
By extended, we mean that you can add new commands to the Tcl language, simply by writing a few routines in C. By embedded, we mean that you can link a C program to the Tcl libraries, giving that program full access to the Tcl language. Whereas most Tcl programs are written as scripts and executed by a precompiled Tcl interpreter, you can include the interpreter routines in your own application.
For example, let's say that you wanted to write a command-driven debugger similar in nature to gdb. The debugger would present a prompt and allow users to enter commands such as step and breakpoint.
If the command syntax for your debugger is simple, you could easily write your own routines in C to read a command and process it. However, this approach becomes more complex when you wish to allow the user to define variables, macros, new functions, and so forth.
Instead of writing these routines from scratch, it is easy to embed a Tcl interpreter into your debugger application. Every command entered by the user would be handled by the interpreter routines. These routines are available as a set of C library functions.
The Tcl language itself includes many, many commands of its own. It provides control structures such as while and for loops, the ability to define functions, string and list manipulation routines, arithmetic functions, and so forth.
On top of these core Tcl routines, your debugger must provide additional commands--such as the aforementioned step and breakpoint. You would implement these commands in C within your application and tell the Tcl interpreter how to use them.
Now your debugger application has all of the power of Tcl at its fingertips. For example, the user customization file for the debugger could be a simple Tcl script. Within this script, the user can define new functions and variables, using Tcl's built-in support for these features.
Among the many extensions to Tcl is Tk, which provides many commands that allow your application to utilize the X Window System as a user interface. (X is introduced in Chapter 10, "Installing the X Window System".) Writing X-based applications as a Tk script is surprisingly easy. For example, the following Tcl/Tk application displays a text-entry widget in which a filename may be entered. It then runs an xterm containing a vi process to edit the file:
#!/usr/bin/wish -f

# Create a label widget, named .l
label .l -text "Filename:"
# Create an entry widget, named .e
entry .e -relief sunken -width 30 -textvariable fname

# Place the two widgets into the application window
pack .l -side left
pack .e -side left -padx 1m -pady 1m

# When the return key is pressed in the entry widget, run xterm
bind .e <Return> {
  exec xterm -e vi $fname
}
We will explain the syntax of this script shortly, but for now you can see that in less than 20 lines of code, we have developed a reasonably complex X application. When this script is executed, it will look like Figure 13-1.
An indication of Tk's usefulness is that the two scripting languages Perl and Python both have interfaces to it.

Figure 13-1. Simple Tk-generated window
For Tcl applications that use only the core Tcl routines, the precompiled interpreter tclsh is provided. This interpreter simply reads Tcl commands and executes them, one by one. In the case of our debugger application, we would write a new program that is linked to the Tcl interpreter library routines.
Likewise, for Tk applications that use only the standard set of Tcl commands and Tk widgets, the wish (window shell) interpreter is provided. wish executes the previous script, as you can see. If you wanted to implement new Tcl commands or Tk widgets, you could write a C program and link it to the Tcl and Tk libraries. In the next sections, we introduce you to writing simple Tcl and Tk scripts, for execution under tclsh or wish. A quick reference to Tcl and Tk is available as Tcl/Tk in a Nutshell by Paul Raines and Jeff Tranter.
13.5.1. Crash Course in Tcl
The Tcl language is easy to learn. If you are at all familiar with other scripting languages, such as the Bourne or C shell, Tcl/Tk will pose no threat to you.
For this reason, we will not spend a great deal of time on the Tcl language itself. It is straightforward and can be learned with the help of the various Tcl manual pages or John Ousterhout's excellent book, Tcl and the Tk Toolkit. This book describes not only how to write Tcl and Tk scripts but also how to use the Tcl/Tk libraries in your own applications.
Let's start with a simple example. The following Tcl script counts the lines in the given filename:
1  #!/usr/bin/tclsh -f
2
3  if {$argc != 1} {
4    error "lc <filename>"
5  }
6
7  set thefile [open [lindex $argv 0] r]
8  set count 0
9
10 while {[gets $thefile line] >= 0} {
11   set count [expr $count + 1]
12 }
13
14 puts "Read $count lines."Each of the arguments to the if command are contained in braces, which group a set of words (or lines) together as a single argument. Although this syntax may remind you of C or Perl, Tcl's command-parsing behavior is actually quite simple. For example, it allows a command argument (here, the body of code on lines 3-5 containing the error command) to span multiple lines only if the opening brace is at the end of a line. If we had written the if command as:
if {$argc != 1}
{ error "lc <filename>" }Error: wrong # args: no script following "$argc != 1" argument
wrong # args: no script following "$argc != 1" argument
while executing
"if {$argc != 1} "
(file "./lc.tcl" line 3)The body of the if command, on line 4, uses the error command to display an error message and exit the Tcl script.
On line 7, we open the file given as the first command-line argument, and assign the resulting file pointer to the variable thefile. The set command must be used to assign values to variables. This is because all Tcl commands must begin with a command name; we can't set the variable a to 1 using something like:
because a refers to a variable, not a command. Instead, we use:a = 1
Later, to refer to the value of the variable a, we would use $a.set a 1
The first argument to set is the name of the variable to assign, and the second argument is the value. Here, we have:
Square brackets […] are used to specify a subscript, a sequence of commands to nest within the current command. The subscript is executed, and its return value substituted in the subscript's place.set thefile [open [lindex $argv 0] r]
For example, let's look at the subscript:
This script executes the open command to open the file given as its first argument. The second argument, r, indicates that the file should be opened for reading.open [lindex $argv 0] r
The first argument to open is the subscript:
The lindex command is used to index a list, or array, of items. In this case, we wish to obtain the 0th element of the $argv array, which contains the command-line arguments to the program, minus the command name itself. (This is unlike the use of argv in C programs.) Therefore, the 0th element of $argv is the first command-line argument.lindex $argv 0
Let's say that we named our script lc.tcl, and invoked it as:
Therefore, within the command:eggplant$ lc.tcl /etc/passwd
the nested subscript:set thefile [open [lindex $argv 0] r]
will be replaced with:open [lindex $argv 0] r
which will, in turn, be replaced with the value of the file pointer corresponding to /etc/passwd. The net result is that the file pointer value is assigned to the variable thefile.open "/etc/passwd" r
On line 8, we set the variable count to 0, which acts as our line counter.
Lines 10-12 contain a simple while loop, which repeatedly reads lines from the file until end of file (EOF):
while {[gets $thefile line] >= 0} {
  set count [expr $count + 1]
}We see the subscript:[gets $thefile line] >= 0
which executes the gets command. This reads a single line from the file pointer $thefile and assigns it to the variable line. gets returns the count of the number of characters read, or -1 if EOF is reached. Therefore, the while loop will continuously read lines from the file until gets returns a value less than zero.gets $thefile line
The body of the while loop is:
which increments the value of count. Remember that Tcl commands must begin with a command name. Therefore, arithmetic expressions are handled using the expr command. Here, the subscript:set count [expr $count + 1]
returns the value of the variable count plus 1. This is the canonical way to increment variables within Tcl.expr $count + 1
Finally, on line 14, we see:
which uses the puts command to display a string to standard output.puts "Read $count lines."
Here is a sample run of this script:
eggplant$ lc.tcl /etc/passwd
Read 144 lines.
13.5.2. Writing Tk Applications
Even the basic Tcl knowledge given in the previous section is enough to allow you to write applications using Tk, the Tcl extensions for the X Window System. Tk is essentially a collection of Tcl commands that create and manipulate X widgets--such as buttons, scrollbars, menus, and so forth. As we will see, Tk is extremely versatile and greatly simplifies the task of building a graphical user interface under X.
A widget is an object you want to manipulate, such as a rectangle. Each widget requires memory and a bunch of properties, but Tk relieves you from thinking about all that. You just create a widget and tell Tk what you want it to look like.
In this section, we'll help the user create an oval and a rectangle: each of those is a widget. But we also need a place to draw them: something fixed where the oval and rectangle are free to move around. So before drawing, we'll create an empty space called a canvas widget. The canvas widget is a generic graphics widget with support for many types of objects, such as ovals, lines, text, and so forth. And to provide the kind of convenient user interface people expect, we'll create a menu widget and a frame widget to hold everything together. When executed, this application looks something like Figure 13-2.
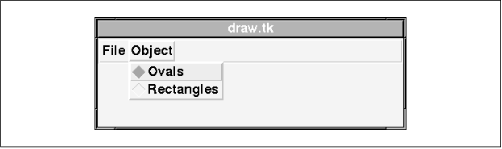
Figure 13-2. Window displayed by Tk program
Let's walk through the source for our application, draw.tcl:
#!/usr/bin/wish -f
# Global variables, used to keep track of objects and positions
set oval_count 0
set rect_count 0
set orig_x 0
set orig_y 0
No sweat here: we simply initialize a few variables to keep track of the oval and rectangle objects we create, as well as the location of the object as it is created.
The next portion of the source may be a bit daunting at first:
# This procedure enables ovals.
proc set_oval {} {
  # Allow us to access these global variables
  global oval_count orig_x orig_y

  # When button-1 is pressed, create an oval
  bind .c <ButtonPress-1> {
    set orig_x %x
    set orig_y %y
    set oval_count [expr $oval_count + 1]
    .c create oval %x %y %x %y -tags "oval$oval_count" -fill red
   }

  # When we drag button 1, delete the current oval and replace it
  bind .c <B1-Motion> {
    .c delete "oval$oval_count"
    .c create oval $orig_x $orig_y %x %y -tags "oval$oval_count" -fill red
  }
}
Here, we define a procedure named set_oval using the Tcl proc command. The first argument to proc is the list of arguments that the procedure will take; in this case, there are none. The second argument is the body of the procedure itself. This procedure is invoked when we select the Ovals item from the Objects menu, which is configured later in this section.
The first thing set_oval does is declare the variables oval_count, orig_x, and orig_y to be globals; otherwise, Tcl would assume we were using these variables locally within the procedure.
The next task is to bind an action to a ButtonPress event in the canvas widget we will be drawing into. This widget is named .c. Tk widgets are named hierarchically. The widget . (a period) refers to the main application window. Any widgets created within that window are given names beginning with a period, such as .c (for a canvas widget), .mbar (for a menu bar), and so on. Of course, the programmer can choose widget names, but those names must begin with a period. As we will see later, widgets may be contained within other widgets; for example, a menu is contained within a menu bar. A widget named:
might refer to the menu menu contained within the menu item file contained within the menu bar .mbar. This is demonstrated later in this section..mbar.file.menu
The bind command creates an event binding for a particular widget.[48] The first argument to bind is the widget in which to create the binding, the second argument is the event to track, and the third argument is the code to execute when that event occurs.
[48]An event is simply a message generated by the X server in response to a user action. For example, when the user presses mouse button 1 (usually the left mouse button) within a certain window, that window is sent a ButtonPress-1 event.
In this case, we wish to start drawing an oval whenever the user presses mouse button 1 in the canvas widget. The code of the binding sets the variables orig_x and orig_y to %x and %y, respectively. Within a binding, %x and %y refer to the x and y coordinates of the event in question. In this case, this would be the cursor position where the mouse button was pressed. We wish to save this location when the oval is resized. In addition, we increment the oval_count variable.
The ButtonPress-1 binding also executes the command:
This creates an oval object within the canvas widget .c. The upper-left and lower-right coordinates of the oval are given as %x and %y, the location of the ButtonPress event. We fill the oval with the color red..c create oval %x %y %x %y -tags "oval$oval_count" -fill red
The -tags option to the canvas create command assigns a "name" to the newly created oval object. In this way, we can refer to this particular oval on the canvas widget by its name. To ensure that each oval has a unique name, we use the oval_count variable, which is incremented each time an oval is created.
When the mouse is dragged with button 1 pressed, we wish to resize the oval. This is accomplished by setting a binding for the B1-Motion event in the canvas widget. This binding executes the two commands:
The canvas delete command deletes the object named by the given tag. We then recreate the oval at its original upper-left corner position, but with the new lower-right corner given by the location of the B1-Motion event. In other words, we are replacing the original oval object with a new oval with different coordinates, corresponding to the position of the mouse. This effectively resizes the oval as the mouse moves across the canvas widget with button 1 pressed..c delete "oval$oval_count" .c create oval $orig_x $orig_y %x %y -tags "oval$oval_count" -fill red
We define an analogous set_rect function, which is nearly identical to the one previously discussed, but creates canvas rectangle objects instead:
# Identical to set_oval, but uses rectangles
proc set_rect {} {
  global rect_count orig_x orig_y
  bind .c <ButtonPress-1> {
    set orig_x %x
    set orig_y %y
    set rect_count [expr $rect_count + 1]
    .c create rectangle %x %y %x %y -tags "rect$rect_count" -fill blue
  }
  bind .c <B1-Motion> {
    .c delete "rect$rect_count"
    .c create rectangle $orig_x $orig_y %x %y -tags "rect$rect_count" \
      -fill blue
  }
}
Another way to draw rectangles and ovals would be to have a generic "draw object" function that uses a variable, say $objtype, to keep track of the current object type. The menu settings (described later) select the object type by setting the value of this variable. In the drawing function, we could simply use a canvas command such as:
However, this assumes that all objects will be drawn in the same way (by clicking on one position and dragging the mouse to size the object). Using separate functions for each object type allows us to specialize the interface for each if we wish to do so..c create $objtype %x %y %x %y -tags "obj$obj_count" -fill blue
Now we are ready to define the various widgets that make up our application. First, we need to create a frame widget to be used as a menu bar. A frame widget merely acts as a container for other widgets:
Here, we create a frame widget named .mbar. The -relief option specifies the display style for this widget--in this case, we wish the menu bar to appear as though it has a "groove" running along its perimeter. The -bd option sets the width of the widget's border, which, in this case, defines the width of the groove.# Create a frame widget to be used as a menubar. frame .mbar -relief groove -bd 3 pack .mbar -side top -expand yes -fill x
The pack command places widgets within the application window, or within other widgets. It is one kind of "geometry manager" available for Tk. In order for a widget to be displayed within the application, a geometry manager must be called to place the widget. pack is provided with Tcl/Tk, and is versatile enough for almost any application. pack allows you to specify how widgets should be placed relative to one another, without having to specify absolute locations.
In this case, we pack the .mbar widget into the top edge of its parent widget, which is . (the main application window). The -fill x option tells pack that the widget should be allocated the entire width of the window in which it is contained; the -expand option specifies that the widget should grow to fill that space. If you are interested in the intricacies of pack, the Tk pack manual page provides a great deal of detail.
Next, we create two menubutton widgets within this menu bar--the File and Object menus:
The two widgets in question are named .mbar.file and .mbar.obj. Therefore, each widget is a direct child of the .mbar widget, not the main application window. When we pack the two widgets, they are packed into the left side of their parent, the menu bar.# Create two menu items menubutton .mbar.file -text "File" -menu .mbar.file.menu menubutton .mbar.obj -text "Object" -menu .mbar.obj.menu pack .mbar.file .mbar.obj -side left
The -menu option to the menubutton command specifies the menu widget that should be displayed when this pulldown menu is selected. We will create the .mbar.file.menu and .mbar.obj.menu widgets later:
# Create the file menu, and add a single "Quit" item to it
menu .mbar.file.menu
.mbar.file.menu add command -label "Quit" -command { exit }# Create the object menu, and add two radiobutton objects to it
menu .mbar.obj.menu
.mbar.obj.menu add radiobutton -label "Ovals" -variable objtype \
-command { set_oval }
.mbar.obj.menu add radiobutton -label "Rectangles" -variable objtype \
-command { set_rect }Here, we create the Objects menu, and add two objects of type radiobutton to it. Radiobuttons define a set of options where only one of the options may be selected at a given time. For example, when Ovals is selected, it is highlighted in the menu and Rectangles is dimmed.
In order to "link" the two radiobuttons (so that only one may be selected at a time), we use the -variable option to specify a "dummy" variable that keeps track of the current setting of the radio buttons. The -variable option may be used in conjunction with -value, which assigns a value to the named variable when the menu item is selected. Instead, we choose to execute a procedure (specified with the -command option) when the menu item is selected, which precludes the need for -value.
Next, we create our canvas widget and pack it into the application window:
# Create the canvas .c
canvas .c
pack .c -side top
Finally, we enable the Ovals option by artificially invoking the corresponding menu item. This is exactly what happens when the user selects the menu item using the mouse:
# Turn on ovals, by invoking the first item in the object menu
.mbar.obj.menu invoke 0
Here, in a few dozen lines of code, we have a complete, relatively complex X application. There are many easy ways to extend this program: for example, by adding new object types, allowing the user to save and load "pictures" created with it, and so on. In fact, the canvas widget even supports an option to dump a PostScript image of its contents, which then can be printed.
13.5.3. Using Tcl and Tk in Other Applications
As mentioned previously, you can use Tcl and Tk with other programs written in languages such as C or Perl. Writing a complex program as a Tcl/Tk script is possible, but it would probably be slower than coding it in a compiled language because Tcl is interpreted. Although Perl is interpreted as well, Perl is suited to many tasks that are more difficult to accomplish in Tcl or C.
The canonical way to use Tcl and Tk with a C program is to link the Tcl and Tk libraries with the C code. Tcl and Tk provide simple .a static libraries, as well as shared .so libraries on some systems. The Tcl interpreter is implemented as a series of functions that your program calls.
The idea is that you implement new Tcl commands as C functions, and the Tcl interpreter calls those functions when one of those commands is used. To do this you must structure your program to initialize the Tcl interpreter and use a Tcl "main loop," which reads Tcl commands from some location (such as a file) and executes them. This is roughly equivalent to building your own tclsh or wish interpreter with a few extra Tcl/Tk commands implemented in C.
This may not be the best solution for all applications. First of all, it requires some of your program to be restructured, and the Tcl interpreter ends up controlling the application--not the other way around. Also, unless you use shared Tcl and Tk libraries, having a complete Tcl/Tk interpreter embedded in your application can make the binary quite large--well over a megabyte. Also, your application may depend on some kind of Tcl script to drive it, which means that the executable is not enough to use the complete application: you need the driving script as well.
Another solution is to write an application in C or Perl that executes the wish interpreter as a separate process and communicates with it via pipes. In this case, you will need two pipes: one for the C program to write commands to wish and another for the C program to read responses from wish. This can be done with a single pipe, but synchronization becomes more difficult. For example, responses from wish may be asynchronous--generated from user events such as a button press--which makes the use of a single pipe a bit complex.[49]
[49]Remember that a pipe is a simple one-way data stream used to communicate from one process to another. The shell allows you to use single pipes between commands, as in cat foo.txt.gz | gunzip -c | more.
The most straightforward way of setting this up is to write a C function that does the following (in pseudocode):
Create two pipes by calling pipe() twice;
Use fork() to start a child process;
  In the child process,
    close the read end of one pipe and the write end of another;
    Use dup2() to duplicate stdin and stdout to the appropriate pipes;
    Use execlp() to start wish;
  In the parent process;
    close the read end of the write pipe, and the write end of the
      read pipe;
    Use fdopen() on each pipe to get a FILE descriptor for use with
fprintf() and fscanf();The parent process (your C application) can now write Tcl/Tk commands to the write pipe and read responses from wish on the read pipe. The select function can be used to poll for data on the read pipe, in case you want your application to keep processing while waiting for data from the wish interpreter.
This way, we treat wish as a "server" for X Window System routines. Your program would send widget-creation commands down the write pipe. wish could be told to print a string to standard output when a response is required from the application. For example, a button widget could be created that prints the string okay button pressed when pressed by the user. Your program would read this string on the read pipe and respond to it. Other parts of the application could be controlled by wish without your application's knowledge. The computing-intensive, speed-critical parts of the application would be coded in C, and the interface handled by wish.
Hopefully, the overview here should be enough to give you an idea of how to write a C or Perl program that uses wish in this way. It's a good idea to read a book on Unix systems programming that talks about interprocess communication using pipes, such as Advanced Programming in the UNIX Environment by Richard Stevens or UNIX System Programming by David Curry.
 |  |  |
| 13.4. Using Perl |  | 13.6. Java |

Copyright © 2001 O'Reilly & Associates. All rights reserved.